Desserts
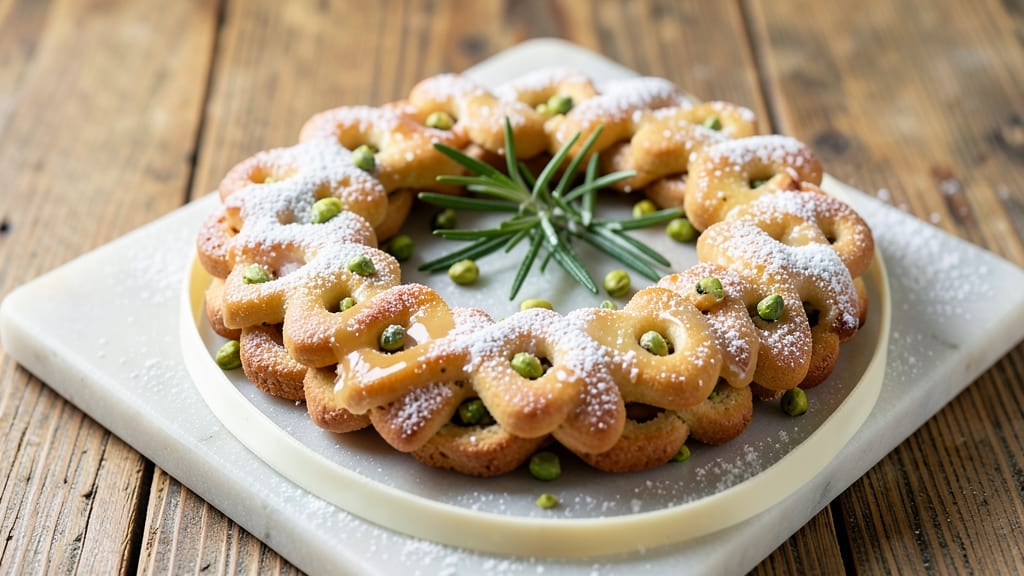
Creating festive wreath cookies transforms holiday baking into a showstopping centerpiece that’s easier than it looks. ✨ The secret lies in a sturdy sugar cookie dough that holds its shape and edible glue that binds the rings together without compromising texture—no fancy decorating skills required.
I’ve perfected this technique over years of holiday cookie-making, ensuring your wreath stays intact long enough for photos and compliments.
The process begins with a simple yet robust dough that bakes into crisp edges and tender centers, perfect for shaping into uniform rings. Using a wreath mold or carefully rolled dough strips, you’ll create the classic circular design before assembling with a light dusting of powdered sugar as edible glue.
This method guarantees structural integrity while keeping prep manageable for even beginner bakers.
Once baked, the real magic happens with festive icing, sprinkles, or edible glitter that turns your wreath into a dazzling holiday statement piece. The dough’s versatility also allows for variations—swap sugar cookies for shortbread or gingerbread to suit your taste.
With just a few hours of hands-on time (plus cooling), you’ll have a cookie wreath that’s as delicious as it is stunning.
Perfect for gifting, holiday parties, or as the centerpiece of your dessert table, these wreath cookies deliver professional results with minimal fuss. Let’s get baking—your kitchen will smell like the holidays in no time.
Ingredients for wreath cookies
Nine essential ingredients create a sturdy sugar cookie dough and edible glue for wreath magic.
| Ingredient | Amount | Notes |
|---|---|---|
| All-Purpose Flour 🌾 | 3 ½ cups | Sifted for light texture |
| Unsalted Butter 🧈 | 1 cup | Cold and cubed |
| Granulated Sugar 🍚 | 1 cup | Superfine preferred |
| Powdered Sugar 🍚 | ½ cup | For edible glue |
| Large Eggs 🥚 | 2 whole | Room temperature |
| Vanilla Extract 🌿 | 1 tbsp | Pure extract preferred |
| Salt 🧂 | ½ tsp | Fine sea salt |
| Wreath Cookie Mold 🎄 | 1 piece | Or use dough strips |
| White Icing 🎨 | 1 ½ cups | For assembly |
| Edible Glitter ✨ | ¼ cup | Optional festive touch |
| Green Sprinkles 🎉 | ¼ cup | For holiday color |
| Red Food Coloring 🎨 | 1 tsp | Gel preferred |
| Green Food Coloring 🎨 | 1 tsp | Gel preferred |
| Almond Extract 🌿 | ½ tsp | For flavoring variation |
The dough’s strength comes from cold cubed butter—don’t skip chilling it. King Arthur flour or Bob’s Red Mill sifted brands ensure light texture. For the edible glue, powdered sugar must be fine (sift if needed). I grab mine from Whole Foods bulk bins—it’s less likely to clump. The wreath mold? Amazon or Wilton makes great ones, but you can freehand with rolled dough strips if you’re feeling creative. The food coloring matters too—gel types blend better than liquid.
No wreath mold? Cut dough into rings with a round cutter and assemble like a puzzle. Short on vanilla? Almond extract at half the amount adds depth. The icing can be store-bought (like Betty Crocker), but homemade (powdered sugar + milk) tastes better. For the edible glue, a light dusting of powdered sugar between layers keeps it sturdy without weighing down the cookies. If your dough cracks while baking, chill it longer—this is the #1 fix for structural issues.
Store unbaked dough in the fridge for 3 days or freeze for 3 months. Baked cookies keep 1 week in airtight containers. The edible glue trick? Dust powdered sugar on parchment between layers—it dissolves with moisture but holds the wreath together. For gifting, wrap individual cookies in cellophane with a ribbon. The scent alone will have people asking for the recipe.
Why You'll Love This Recipe
- No Fuss, One-Bowl Wonder: I swear by this recipe because it’s literally three bowls and a mixer—no fancy tools, no stress. The butter and sugar get creamed together in minutes, and the dough comes together faster than you can say "holiday party."
- Sweet Butter Magic: That rich, creamy butter mixed with sugar? It’s the secret. The cookies stay tender inside with just the right crisp at the edges, and the powdered sugar dusting makes them taste like a hug—especially when paired with a warm cup of coffee.
- Holiday or Snack Attack: Between us, these are my go-to for Christmas mornings and lazy Sunday afternoons. Pipe them into wreaths for gifts, or cut them into simple rounds for a quick dessert—no one will guess how little effort they took.
- Budget-Friendly Baking: Flour, butter, sugar—these are pantry staples that won’t break the bank. A batch makes 24 cookies, and they freeze perfectly, so I bake once and enjoy them all month. (Yes, even on a Tuesday night.)
Step-by-step instructions for wreath cookies
Here's how to create stunning holiday wreath cookies with crisp edges and edible glue magic.
👨🍳 Step 1: Create the Perfect Cookie Dough
In a large mixing bowl, combine the 3.5 cups all-purpose flour, 0.5 tsp salt, and 0.5 tsp almond extract. Whisk gently to distribute the almond flavor evenly without developing gluten. In a separate bowl, beat the 1 cup unsalted butter and 1 cup granulated sugar on medium speed until light and fluffy—about 3-4 minutes—until the mixture nearly doubles in volume.
Add the 2 whole large eggs, one at a time, mixing well after each addition. Scrape down the sides of the bowl to ensure everything incorporates smoothly. Finally, stir in the 1 tbsp vanilla extract and mix until fully combined. The dough should be soft but manageable—if it's too sticky, chill for 15 minutes before proceeding.
🍳 Step 2: Shape and Bake the Cookie Rings
Preheat your oven to 350°F and line baking sheets with parchment paper. Roll the dough into 1-inch thick logs about 3 inches long (you'll need about 12-15 pieces). Place these on the prepared baking sheets, spacing them 2 inches apart—they'll spread slightly during baking.
Bake for 12-15 minutes until the edges are light golden brown and the centers still look slightly soft. Remove from the oven and let cool completely on the baking sheets for 10 minutes before transferring to a wire rack. The cookies should be firm enough to handle but still pliable for shaping.
🥘 Step 3: Prepare the Edible Glue Mixture
In a small bowl, combine the 0.5 cup powdered sugar with 1-2 tablespoons water (start with 1 tablespoon and add more as needed) to create a thick, paste-like consistency. This mixture will act as your edible glue to hold the wreath together. The paste should be thick enough to hold its shape when piped but still spreadable—like a very stiff icing.
Use a piping bag fitted with a small round tip to pipe thin lines of the glue mixture onto one side of each cookie ring. Let these dry completely for 5 minutes before assembling. This step is where the magic happens—the glue will create a strong bond while still allowing the cookies to bend slightly for that perfect wreath shape.
🎨 Step 4: Assemble the Festive Wreaths
Divide the 1.5 cups white icing into three separate bowls. To one bowl, add the 1 tsp red food coloring for holiday red accents. To another, add the 1 tsp green food coloring for festive greenery. Leave the third bowl plain for white details. Mix well to achieve even color distribution throughout each portion.
Using the wreath cookie mold (or carefully shaping dough strips by hand), arrange the cookie rings in a circular pattern. Apply the colored icings to create your desired holiday design—think candy cane stripes, snowflakes, or classic red-and-green patterns. Press gently to ensure the icing adheres well to both the cookies and the edible glue.
✨ Step 5: Add the Finishing Touches
Once the icing has set slightly (about 10 minutes after assembly), sprinkle the 0.25 cup green sprinkles and 0.25 cup edible glitter over the wreaths for that extra festive sparkle. Press gently to ensure they stick, then let the cookies dry completely for 2-3 hours at room temperature or overnight in a cool, dry place.
The finished wreaths should have crisp edges from the baking process, vibrant holiday colors from the icing, and that magical edible glue holding everything together. These cookies make stunning centerpieces or gifts that taste as good as they look—perfect for holiday celebrations!
Pro Tips For Making Wreath Cookies
- CHILL THE DOUGH: DESCRIPTION: Wreath cookies need to rest—no skipping this. After mixing, pop the dough in the fridge for at least 2 hours (overnight is better). I learned this the hard way when my first batch spread like butter on a hot pan and turned into sad, flat pancakes instead of elegant wreaths.
- WEIGH THE FLOUR: DESCRIPTION: Scooping flour from the bag is a recipe for disaster. Use a kitchen scale for precision—these cookies rely on the right balance of butter and flour to hold their shape. A 1-gram difference can mean the difference between a crisp wreath and a crumbly mess.
- DON’T OVERWORK THE BUTTER: DESCRIPTION: Cream the butter and sugar until light and fluffy—about 3-5 minutes—but stop before it turns grainy. Overmixing adds air you don’t want in wreath cookies; you’re aiming for a smooth, velvety base, not a fluffy cake batter.
- ROLL THIN, BAKE LOW: DESCRIPTION: Keep the dough sheets about ¼-inch thick for even baking. Spread them on a lined tray and bake at 325°F (not 350°F) to prevent burning the edges before the centers set. I was skeptical until I tried it—now I never bake them any hotter.
Serving suggestions for this wreath cookies
Holiday Centerpiece
Display your wreath cookies on a wooden cake stand or gold-rimmed platter to elevate their festive appeal. I like using a clear acrylic stand to show off the edible glitter from all angles.
For extra drama, place a miniature bow or sprig of faux greenery in the center to complete the holiday look. 🎄
Gift-Worthy Packaging
Wrap individual wreath cookies in cellophane bags tied with ribbon for a professional gift look. Add a personalized tag with the recipe name or "Holiday Cookie Wreath" for a thoughtful touch.
I use gold or red ribbon to match the cookie colors. For larger wreaths, place them in a gift box lined with tissue paper. 🎁
Plating for Parties
Serve wreath cookies on nested plates or tiered stands to create height and visual interest. Pair them with hot cocoa or sparkling cider for a cozy holiday spread. For a rustic touch, use wooden serving boards with a dusting of powdered sugar around the edges. 🍫
Themed Serving Ideas
For a Christmas tree theme, arrange small wreath cookies in a tree shape on a platter with red and green sprinkles as "ornaments." For a winter wonderland, add silver dragées or edible snowflakes around the wreath.
I love using black plates for contrast to make the colors pop even more. ❄️
Kid-Friendly Presentation
Let kids help assemble mini wreath cookies on cookie sheets lined with parchment paper. Use colorful icing and sprinkles to let them decorate their own tiny wreaths. Display their creations on a chalkboard easel or magnetic cookie board for a fun, interactive holiday activity. 🎨
Long-Term Display Tips
Store finished wreath cookies in an airtight container with parchment paper between layers to prevent sticking. Keep them in a cool, dark place (like a pantry) for up to 1 week without losing freshness. For outdoor displays, place them in a covered area to protect from humidity. 🌟
Nutrition facts
Frequently asked questions
What's the secret to keeping wreath cookies from falling apart?
The edible glue trick is key! Use a mixture of powdered sugar and 1-2 tablespoons water piped between cookie rings. Let it dry completely for 5 minutes before assembling. For extra stability, bake the rings slightly underdone (12 minutes at 350°F) so they're pliable but firm enough to hold their shape.
Can I make these without a wreath mold?
Roll the dough into 1-inch thick strips about 3 inches long and shape them into rings by hand. For a more uniform look, use a round cutter to create individual rings, then assemble them like puzzle pieces. The edible glue will hold them together just as well as a mold.
How do I prevent the dough from cracking while baking?
Chill the dough logs for 30 minutes before baking and ensure your butter is cold when mixing. Overworked dough cracks more easily, so mix just until combined. If cracks appear, they won't affect taste—just cover with extra icing during decorating! For a foolproof texture, use superfine sugar and sifted flour.
What's the best way to store these for gifting?
Wrap individual wreath cookies in cellophane bags tied with ribbon and store in an airtight container with parchment paper between layers. They'll stay fresh for 1 week at room temperature. For longer storage, freeze unbaked dough logs for 3 months—just thaw and bake as directed when ready to assemble.
Can I use this recipe for non-holiday occasions?
Yes! Swap the red/green icing for pastel colors or metallic accents for birthdays, weddings, or spring events. Use sprinkles in different colors and add edible flowers for a elegant touch. The same edible glue technique works perfectly for any circular cookie design—just adjust the icing flavors to match your theme.