Desserts
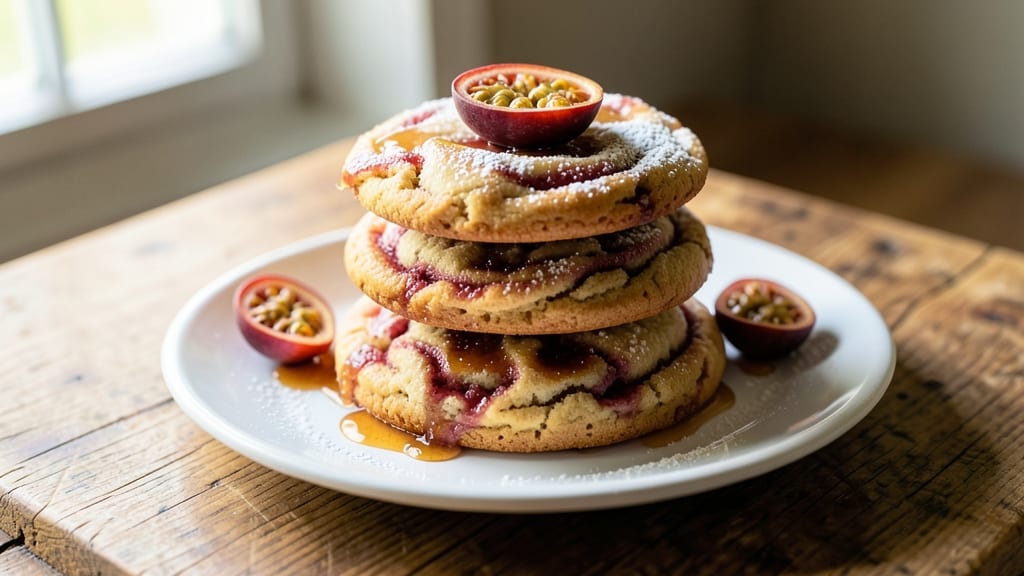
This guava cookies recipe transforms simple ingredients into chewy, citrus-kissed bites that taste like a tropical vacation in every bite. The secret lies in balancing ripe guava's natural sweetness with just enough tartness to keep flavors bright and complex.
I developed this recipe after years of experimenting with fruit-based cookies, and the texture—soft centers with slightly crisp edges—is what sets it apart from standard sugar cookies.
What makes these cookies special is their foolproof method: guava purée replaces some of the butter for moisture without sacrificing structure, while a touch of lemon zest enhances the tropical flavor profile.
The dough comes together in under 15 minutes, and baking time is precise at 10-12 minutes per batch, ensuring perfect doneness every time. This recipe delivers restaurant-quality results with minimal effort.
By the time you pull these golden-brown cookies from the oven, you'll have a tray of chewy, aromatic cookies with a subtle citrus tang that lingers on the palate. The guava's natural sweetness shines through while maintaining a balanced flavor that's neither cloying nor underwhelming.
These cookies pair beautifully with afternoon tea or as a festive dessert for gatherings.
For added texture, consider folding in chopped macadamia nuts or dark chocolate chips before baking. The recipe scales easily for holiday baking, and leftovers stay fresh for up to 5 days when stored properly. Let's get baking these tropical treats!
Ingredients for guava cookies
Tropical flavors start with ripe guava and citrus zest for bright, chewy cookies.
| Ingredient | Amount | Notes |
|---|---|---|
| Ripe Guava 🍈 | 1 ½ cups | Puréeed, no seeds, store-bought or homemade |
| Unsalted Butter 🧈 | ½ cup | Cold, cubed, full-fat for best texture |
| Granulated Sugar 🍚 | 1 cup | White or light brown preferred |
| Light Brown Sugar 🍚 | ½ cup | Packed, for chewiness |
| Large Eggs 🥚 | 2 whole | Room temperature, for even mixing |
| Vanilla Extract 🌿 | 1 tsp | Pure, high-quality preferred |
| All-Purpose Flour 🌾 | 2 cups | Sifted, for light texture |
| Baking Soda 🧂 | ½ tsp | Freshly opened for best rise |
| Salt 🧂 | ¼ tsp | Fine sea salt for balance |
| Lemon Zest 🍋 | 1 tbsp | Freshly grated, bright flavor |
| Lemon Juice 🍋 | 1 tbsp | Freshly squeezed, for tang |
| Optional Macadamia Nuts 🥜 | ½ cup | Chopped, toasted for texture |
| Optional Dark Chocolate Chips 🍫 | ½ cup | 70% cacao, semi-sweet |
The guava is everything here—ripe, red-skinned guavas from a Latin market or specialty store have the best flavor. If you can't find fresh, Trader Joe's guava purée works perfectly. Never use unripe guava; it'll make the cookies taste bitter. The lemon zest and juice balance the sweetness—use Meyer lemons if available—their floral notes complement the guava beautifully. For the butter, Plugrá or Land O'Lakes brands work well, but any good-quality unsalted butter will do. Keep everything cold until mixing to prevent the dough from spreading too much in the oven.
No guava purée? Mango purée at half the amount works in a pinch, though the flavor won't be identical. Substitute brown sugar with white if needed, but the texture will be slightly less chewy. For the nuts, pecans or walnuts are great alternatives, but macadamias add a buttery richness that pairs perfectly with guava. If you're avoiding chocolate, try white chocolate chips instead—they'll keep the cookies light while adding a sweet contrast. The vanilla extract should be pure; imitation won't have the same depth of flavor. And don't skip the lemon zest—it's what elevates these from ordinary fruit cookies to something truly special.
Store the dough in an airtight container in the fridge for up to 3 days—it actually improves as it rests. Baked cookies keep at room temperature for 5 days in an airtight container or 3 months frozen between parchment layers. For extra chewiness, underbake slightly (pull them out at 340°F instead of 350°F). These cookies reheat beautifully—just 10 seconds in the microwave with a damp paper towel to restore moisture. Perfect for gifting in holiday tins or sharing at tea time.
Why You'll Love This Recipe
- No Chopping Needed: I swear, the only prep is scooping guava pulp straight from the fruit into the bowl—no dicing, no peeling, just a spoon and a little patience for the seeds. The butter and sugars mix themselves into golden perfection while you’re still wiping your hands.
- Tropical Chew Factor: That caramelized brown sugar crust? It’s like a hug from a bakery in the tropics. The guava’s natural sweetness cuts through the buttery richness, giving you a cookie that’s almost too good to share—until you remember how fast they disappear.
- Weeknight Snack Hero: Honestly, these cookies are my go-to when I need something fast but still feels special. Toss a batch in the oven while you’re waiting for dinner to cook, and suddenly you’ve got a dessert that tastes homemade but took zero effort.
- Budget-Friendly Luxury: Between us, guava is often cheaper than store-bought cookie dough, and these cookies stay fresh for days in an airtight container. I’ve even frozen them—just pull one out for a treat when you’re craving something sweet but don’t want to bake.
Step-by-step instructions for guava cookies recipe
Here's how to create chewy, citrus-infused cookies with tropical guava flavor and perfect texture.
Prepare the Guava Purée
Start by puréeing the 1.5 cups ripe guava until completely smooth, using a food processor or blender. You want a consistency similar to applesauce—no visible seeds or chunks. I like to strain it through a fine-mesh sieve if I'm using store-bought guava to remove any excess pulp that might make the cookies dense.
Add the 1 tablespoon lemon juice and 1 tablespoon lemon zest to the guava purée, mixing well. This brightens the flavor and prevents the guava from becoming overly sweet. Set the purée aside—it will add natural moisture and sweetness to your cookies while keeping them tender.
Cream Butter and Sugars
In a stand mixer fitted with the paddle attachment, beat the 0.5 cup unsalted butter (cold, cubed) with the 1 cup granulated sugar and 0.5 cup light brown sugar on medium speed for 3-4 minutes. The mixture should become light and fluffy, nearly doubling in volume, with a pale color. This creaming process incorporates air, which creates those signature crackly tops and chewy centers.
I press down gently on the butter mixture during the first minute—this prevents it from curdling and ensures even distribution of the sugars. You'll know it's ready when it leaves a trail in the bowl that slowly melts back in, indicating proper aeration.
Mix in Eggs and Flavorings
Add the 2 whole large eggs (room temperature) one at a time, mixing on low speed for 30 seconds after each addition until fully incorporated. Then add the 1 teaspoon vanilla extract, 1.5 cups guava purée, and mix until just combined. The batter should be thick but pourable—if it's too stiff, add 1-2 teaspoons of milk (though we're not using milk in this recipe, this is a common troubleshooting step).
This is where the guava's natural sweetness comes into play. The purée adds moisture and a subtle tropical flavor that balances the citrus notes from the lemon. Don't overmix at this stage—just until everything is evenly distributed.
Combine Dry Ingredients
In a separate bowl, whisk together the 2 cups all-purpose flour, 0.5 teaspoon baking soda, and 0.25 teaspoon salt. Sift the mixture directly into the wet ingredients, then gently fold in the 0.5 cup optional macadamia nuts (if using) and 0.5 cup optional dark chocolate chips (if using) using a silicone spatula. Fold just until combined—you should still see some flour streaks. Overmixing develops gluten, which can make the cookies tough.
The baking soda ensures a light rise, while the salt balances the sweetness. If you're adding nuts or chocolate, distribute them evenly throughout the dough. This is also a good time to taste a small spoonful of dough—it should be sweet, tangy, and slightly tropical in flavor.
Chill and Bake
Cover the dough with plastic wrap and refrigerate for at least 30 minutes (I prefer 1 hour for best results). Chilling prevents the cookies from spreading too much in the oven and allows the flour to fully hydrate, resulting in a chewier texture. The guava purée makes the dough slightly sticky, so I press it into a flat disk before wrapping it—this makes it easier to handle later.
Preheat your oven to 350°F and line two baking sheets with parchment paper. Scoop the chilled dough into 1.5-tablespoon portions (I use a medium cookie scoop for uniform size) and place them 2 inches apart on the prepared sheets. Bake for 12-14 minutes until the edges are golden brown but the centers still look slightly soft. They'll firm up as they cool.
Cool and Enjoy
Let the cookies cool on the baking sheet for 5 minutes before transferring them to a wire rack. They should be soft and chewy in the center with a slightly crispy edge. The guava adds natural moisture, so these cookies stay tender longer than traditional sugar cookies. Serve warm for the ultimate experience—they're perfect with a glass of iced tea or a cup of coffee.
Real talk: These cookies are best enjoyed within 3 days of baking. If you have leftovers, store them in an airtight container at room temperature. The guava flavor intensifies slightly as they sit, so they taste even better the next day!
Pro Tips For Making Guava Cookies
- Mash Guava Like Pulp: Skip the chunks—this isn’t guava pie. Blend the fruit until it’s smooth, then strain out the seeds through a fine-mesh sieve. I learned this the hard way after biting into a cookie with a surprise seed. (Yes, it’s extra work, but your teeth will thank you.)
- Cream Butter Cold: Take the butter straight from the fridge—no softening at room temp. Cold butter traps air better when creamed with sugar, giving you that signature tender crumb. I used to rush this, and the cookies turned out dense. (Your mixer will hate you less too.)
- Don’t Overbake Brown Sugar: Pull cookies out when edges are just golden, not caramelized. Light brown sugar burns faster than you’d think, and overbaked guava cookies taste like sad, dry cardboard. A toothpick test works—it should have moist crumbs, not dry powder.
- Chill Dough Twice: First, refrigerate the dough for 30 minutes after mixing. Then, flatten balls and freeze them for 10 minutes before baking. This prevents spreading and keeps the guava flavor from cooking off too fast. (I know, it’s two extra steps—but the texture is worth it.)
Make-ahead tips for this dish
Dough Prep Ahead
Make life easier by preparing the dough 24 hours in advance—this is my secret for foolproof baking. After mixing all ingredients, cover the dough tightly with plastic wrap and refrigerate. The flavors meld beautifully overnight, and the texture becomes even more chewy.
I like to press the dough into a flat disk before wrapping to prevent air pockets that could affect baking. 🌟
Baking in Batches
Prevent oven crowding by baking one tray at a time—this ensures even heat distribution for perfect cookies. If you're making a large batch, let the oven return to 350°F between batches for 5-10 minutes.
I use a cookie scoop for uniform portions, but if you're short on time, roll the dough into 1-inch balls by hand. For extra crisp edges, bake the second tray 1-2 minutes longer than the first.
Freezing Dough Balls
Save time on busy days by freezing dough balls in a single layer on a tray before transferring to a freezer bag. Thaw in the fridge for 1-2 hours before baking—no need to adjust oven time.
I like to label bags with the date; frozen dough keeps for up to 3 months. For best results, bake straight from frozen, adding 1-2 extra minutes to the baking time. 🧊
Storage for Freshness
Keep baked cookies fresh by storing them in an airtight container with a paper towel to absorb moisture. At room temperature, they stay tender for 5 days, while freezing between parchment layers extends shelf life to 3 months.
For a restaurant-quality touch, dust with powdered sugar or a sprinkle of flaky sea salt before serving. The guava flavor actually deepens over time, making them taste even better the next day!
Reheating for Warmth
Revive cookies with 10 seconds in the microwave on high, covered with a damp paper towel. For a crispier texture, warm in a 350°F oven for 3-5 minutes.
I also love serving them warm with a drizzle of honey or a scoop of vanilla ice cream for a tropical dessert twist. The chewy centers soften beautifully when reheated, making them perfect for quick snacks or last-minute guests. ✨
Nutrition facts
Frequently asked questions
Can I substitute fresh guava with canned or frozen guava?
Fresh guava yields the best flavor, but you can use 1.5 cups canned guava purée (drained) or 1.5 cups frozen guava purée thawed. For a smoother texture, strain out excess liquid. Avoid chunky guava—it can make the cookies dense. If using canned guava, reduce other liquids slightly to maintain proper dough consistency.
Why did my guava cookies turn out too sweet?
Too much sugar or overly ripe guava can make cookies overly sweet. Balance the flavor by adding 1 extra tablespoon lemon juice or ½ teaspoon vanilla extract to the dough. For future batches, reduce granulated sugar by 1-2 tablespoons and let the guava's natural sweetness shine. Taste the dough before baking—it should be pleasantly sweet, not cloying.
How do I make these cookies gluten-free?
Replace all-purpose flour with a 1:1 gluten-free baking flour blend (like Bob's Red Mill) plus ½ teaspoon xanthan gum. For chewiness, add 1-2 tablespoons ground flaxseed or psyllium husk to the dry ingredients. Chill the dough longer (2 hours) to prevent spreading. Note: Texture may be slightly different, but flavor remains bright and tropical.
Can I bake these without an oven?
Yes! Use a cast-iron skillet on the stovetop over medium-low heat with 1 tablespoon butter or oil per batch. Cook dough balls for 4-5 minutes per side until golden. For a crispier texture, finish under a broiler for 1-2 minutes. These work well with a campfire grill too—just monitor closely to avoid burning.
What’s the best way to decorate guava cookies?
Try these easy ideas: Dust with powdered sugar for a snowy finish, drizzle with melted white chocolate, or sprinkle with toasted coconut flakes. For a festive touch, add edible gold leaf or a dusting of tahini for nutty contrast. Keep it simple—these cookies taste best when their natural tropical flavors shine through.