Desserts
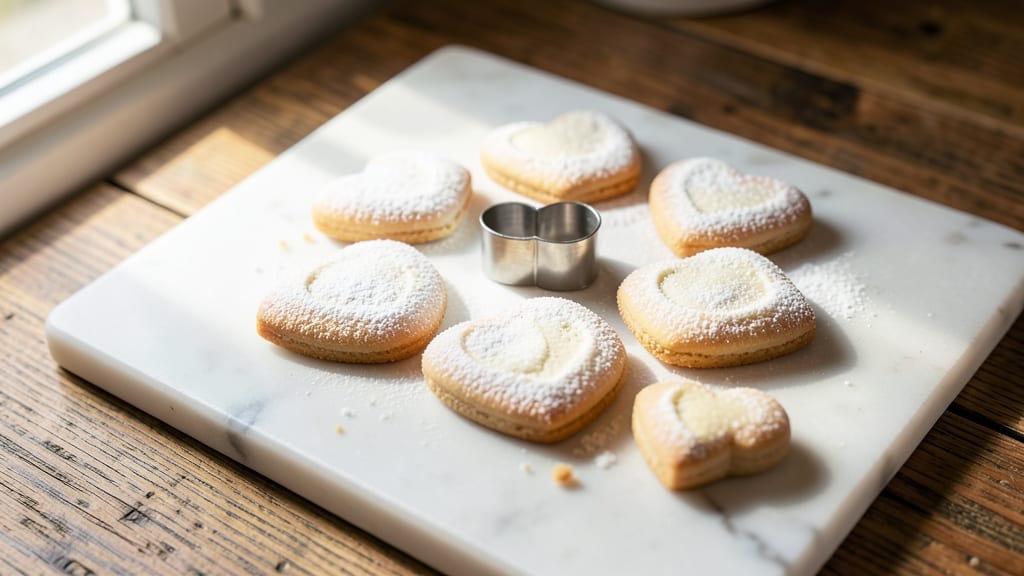
This mini heart sugar cookies recipe delivers perfectly shaped, tender cookies with crisp edges that hold their festive form—ideal for holidays or special occasions. The secret lies in a precise dough ratio and proper baking technique, ensuring every batch turns out consistently delicious.
I’ve tested countless variations to perfect the balance between chewy centers and delicate edges, so you don’t have to worry about spreading or collapsing.
What makes these cookies stand out is their foolproof method for cutting clean heart shapes, whether using a template or a cookie cutter. The dough holds its form beautifully during baking, thanks to a touch of cornstarch that prevents sticking and ensures crisp edges.
Once cooled, they’re ready for decorating with royal icing, sprinkles, or a simple dusting of powdered sugar for a professional finish.
Baking at 325°F guarantees even cooking, while a 10-minute chill before baking prevents spreading. The result? A tray of perfectly proportioned, tender cookies with just the right amount of sweetness—no one will guess they’re homemade.
These are perfect for gifting, holiday displays, or adding a touch of romance to any celebration.
For extra flair, try piping royal icing borders or adding edible glitter. The dough keeps well for up to 48 hours, so you can prep ahead and focus on decorating. Let’s get baking—your cookies will be the highlight of any table.
Ingredients for mini heart sugar cookies
Festive dough, precise cuts, and tender hearts—just 13 ingredients for showstopping cookies.
| Ingredient | Amount | Notes |
|---|---|---|
| Unsalted Butter 🧈 | ½ cup | Cold, cubed for easier mixing |
| Granulated Sugar 🍚 | ¾ cup | Superfine preferred for smooth texture |
| Light Brown Sugar 🍚 | ¼ cup | Packed, for chewiness |
| Large Eggs 🥚 | 1 whole | Room temperature for even mixing |
| Vanilla Extract 🍯 | 1 tsp | Pure, high-quality extract |
| All-Purpose Flour 🌾 | 1 ½ cups | Sifted, spooned into cups |
| Cornstarch 🌾 | 2 tbsp | For crisp edges |
| Diamond Crystal Kosher Salt 🧂 | ½ tsp | Fine grain preferred |
| Powdered Sugar 🍚 | ½ cup | For dusting, sifted |
| Red Food Coloring 🎨 | ¼ tsp | Gel form for vibrant color |
| Heart-Shaped Cookie Cutter ❤️ | 1 piece | 2-inch diameter preferred |
| Royal Icing 🎂 | ½ cup | For decorating, store-bought or homemade |
| Edible Glitter ✨ | 1 tbsp | Optional for festive touch |
The butter needs to be cold—cut it into cubes and chill for 15 minutes before mixing. Land O'Lakes or Plugrá are my go-tos for reliable quality. Superfine sugar (or pulse regular granulated in a food processor) ensures silky dough. The cornstarch is non-negotiable—it's what gives those crisp edges. Bob's Red Mill sells it in bulk if you bake often. For the cookie cutter, Wilton's 2-inch heart shape is perfect, but any 2-inch cutter works. If you don't have one, use a heart template and a sharp knife for clean cuts.
No superfine sugar? Pulse regular granulated in a food processor for 30 seconds. Short on brown sugar? Substitute with white sugar plus 1 tsp molasses. The red food coloring can be swapped for natural beet powder (1/4 tsp) if you prefer dye-free. For royal icing, Wilton's store-bought is foolproof, but homemade (powdered sugar + egg whites) works too. The edible glitter? Sugarfina has the most vibrant options—worth the splurge for special occasions. If you're decorating, chill the cookies 10 minutes before icing to prevent melting.
Dough keeps 48 hours wrapped in plastic in the fridge—perfect for prepping ahead. For longer storage, freeze portions for up to 3 months. Once baked, let cookies cool completely before decorating to prevent smearing. Icing sets faster in cool weather, so work in a 60°F room if your kitchen is warm. These cookies stay fresh 5 days in an airtight container, though they rarely last that long.
Why You'll Love This Recipe
- No Mixer Needed: Mixing this dough is ridiculously simple—just cream the butter and sugars until light, crack in the eggs, and fold in vanilla. No stand mixer? No problem. A sturdy spoon and your elbow work just fine.
- Buttery-Sweet Magic: That combo of brown and granulated sugar plus cold butter creates the perfect texture—crisp edges, soft centers, and a flavor that’s dangerously addictive. Honestly, the first bite makes you want to bake another batch immediately.
- Holiday or Snack Attack: These little hearts are perfect for Valentine’s Day gifts, but they’re also my go-to for movie nights or when I need a quick sweet fix. (Yes, even on a Tuesday night.)
- Makes a Batch, Keeps Forever: The dough stays fresh in the fridge for days, and baked cookies freeze beautifully. I’ve pulled them out months later, warmed them up, and they taste like they were just out of the oven. Budget-friendly? Absolutely.
Step-by-step instructions for mini heart sugar cookies
Here's how to create delicate, perfectly shaped heart cookies that hold their form beautifully.
Cream Butter and Sugars to Light and Fluffy
In a stand mixer fitted with the paddle attachment, combine the 0.5 cup unsalted butter (cold and cubed) with the 0.75 cup granulated sugar and 0.25 cup light brown sugar. Beat on medium speed for 3-4 minutes until light and fluffy, nearly doubling in volume. You'll see the mixture turn pale and airy—this is crucial for tender cookies that hold their shape.
I like to scrape down the sides of the bowl every 30 seconds to ensure even mixing. The butter should be fully incorporated with no visible lumps, and the texture should resemble whipped cream. This creaming process develops the structure that prevents the cookies from spreading too much when baked.
Add Eggs and Vanilla for Rich Flavor
Add the 1 whole large egg (room temperature) and mix on low speed until fully combined. Then add the 1 teaspoon vanilla extract and mix for another 15 seconds. The mixture will look slightly thicker but still smooth. This step ensures the cookies have that classic vanilla sweetness and proper moisture balance.
Don't overmix here—just until everything is incorporated. Overmixing develops gluten, which can make the cookies tough. The dough should be smooth and hold together when pressed between your fingers, but still be pliable enough to cut cleanly with the heart-shaped cutter.
Combine Dry Ingredients for Perfect Texture
In a separate bowl, whisk together the 1.5 cups all-purpose flour, 2 tablespoons cornstarch, and 0.5 teaspoon diamond crystal kosher salt. The cornstarch is key here—it helps create those crisp edges while keeping the centers tender. Gradually add this dry mixture to the wet ingredients, mixing on low speed until just combined.
Then fold in the 0.25 teaspoon red food coloring (gel form) using a silicone spatula. The dough should be a vibrant pink color. If it looks too dry, add 1 teaspoon of milk (though we're not using milk in this recipe, it's a common troubleshooting tip). The dough should be soft but hold together when pressed.
Chill the Dough for Clean Cuts
Divide the dough into 2 equal portions and flatten each into a ½-inch thick disk. Wrap tightly in plastic wrap and refrigerate for at least 1 hour (or up to 24 hours). Chilling is non-negotiable—it firms up the dough so it holds the heart shape perfectly when cut.
I know it's tempting to skip this step, but trust me: cold dough means clean edges and less spreading. If you're short on time, place the dough disks in the freezer for 20 minutes—just don't leave them in longer than 1 hour or they'll become too hard to roll.
Roll and Cut Perfect Hearts
Preheat your oven to 350°F and line two baking sheets with parchment paper. On a lightly floured surface, roll out one disk of dough to about ¼-inch thickness. Use the heart-shaped cookie cutter to cut out shapes, gently re-rolling the scraps as needed. Place cookies 2 inches apart on the prepared baking sheets.
For the best results, I press down gently on the cutter as I lift to ensure clean edges. Bake for 8-10 minutes until the edges are just set but still look slightly soft in the center. They'll firm up as they cool. Rotate the baking sheets halfway through for even baking—this prevents one side from cooking faster than the other.
Decorate with Royal Icing and Glitter
Let the cookies cool completely on the baking sheets. Once fully cooled, prepare the 0.5 cup royal icing according to package instructions (if homemade, follow your preferred recipe). Transfer to a piping bag fitted with a small round tip for precise detailing.
Pipe simple outlines or fill the entire heart with icing. While the icing is still wet, sprinkle with the 1 tablespoon edible glitter for a festive touch. Let the decorations dry completely before serving. The royal icing should set to a smooth, matte finish that makes these cookies look as good as they taste.
Dust with Powdered Sugar (Optional)
For an extra-special presentation, dust the cooled cookies with 0.5 cup powdered sugar using a fine-mesh sieve. This creates a beautiful, snowy effect that contrasts perfectly with the vibrant pink hearts. Store in an airtight container for up to 5 days—though they likely won't last that long!
These cookies are perfect for Valentine's Day, gift-giving, or any occasion where you want something sweet, festive, and absolutely picture-perfect. The secret to their success lies in the chilling step and precise baking time—don't rush either one!
Pro Tips For Making Mini Heart Sugar Cookies
- CHILL THE DOUGH: I learned this the hard way—rolling out warm dough for mini hearts leads to uneven shapes and spread. Pop the dough in the fridge for 30 minutes before cutting, especially if your kitchen’s warm. The cold butter won’t soften as much, and those hearts will hold their shape better.
- CREAM THE BUTTER WELL: This isn’t about looking pretty—it’s about texture. Beat the unsalted butter and sugars until the mixture is light and fluffy, with ribbons that hold for 10 seconds. I used to rush this, and my cookies turned out dense. Take the extra 2 minutes; your mini hearts will be tender, not chewy.
- WEIGH THE BROWN SUGAR: Pack that light brown sugar into the measuring cup and level it off—don’t scoop and hope. Too much air means your cookies will spread unevenly, and the hearts might lose their shape. A kitchen scale makes this foolproof, but if you’re measuring by cup, press it down firmly.
- BAKE IN BATCHES: Don’t overcrowd the tray, even for mini cookies. I used to fit 24 hearts on a sheet, and they’d bake unevenly—some golden, some pale. Stick to 18-20 per tray, with at least 1 inch between them. Your oven’s hot spots will thank you, and the edges won’t burn while the centers stay soft.
Flavor customization for this dish
Classic Vanilla Twist
Stick with the original recipe’s vanilla extract for a timeless, crowd-pleasing flavor. The 1 teaspoon of pure extract enhances the butter and sugar without overpowering the delicate dough. For an extra touch, add ½ teaspoon almond extract alongside the vanilla—it deepens the flavor without altering the color.
This subtle upgrade makes the cookies taste like they came from a high-end bakery. 💛
Citrus Zest Brightness
Infuse the dough with 1 teaspoon lemon or orange zest (finely grated) for a refreshing twist. The citrus brightens the sweetness and pairs beautifully with the red food coloring. I like to mix the zest into the wet ingredients alongside the vanilla.
For a stronger flavor, use ½ teaspoon citrus extract (like McCormick’s) instead of zest. These cookies taste like a sunny day in spring.
Spiced Warmth
Add ½ teaspoon cinnamon or ¼ teaspoon cardamom to the dry ingredients for a cozy, aromatic flavor. The spices blend seamlessly with the vanilla and butter, creating a warm, comforting profile. For a festive kick, combine ¼ teaspoon each of cinnamon and nutmeg—this works especially well during the holidays.
The spices also enhance the dough’s tenderness, making every bite feel extra special. ✨
Chocolate-Dipped Hearts
Skip the royal icing and dip half of each cooled cookie into melted dark or white chocolate. Let the excess drip off, then place on parchment-lined trays to set. For extra flair, sprinkle with crushed pistachios or sea salt flakes before the chocolate hardens.
This variation adds a rich, decadent contrast to the sweet, tender cookie. I use Ghirardelli 60% dark chocolate for the best melt-and-set texture.
Coffee or Espresso Infusion
For a sophisticated twist, mix 1 teaspoon instant espresso powder into the dry ingredients. The coffee enhances the vanilla and brown sugar, adding depth without bitterness. If you prefer a stronger coffee flavor, add ½ teaspoon coffee extract to the wet ingredients.
These cookies pair perfectly with a cup of cappuccino or chocolate-dipped strawberries for a dessert spread that feels like a café experience. 💡
Seasonal Flavors
Adjust the flavor profile based on the season: For winter, add ½ teaspoon pumpkin pie spice and reduce the red food coloring slightly. For spring, swap the red dye for ½ teaspoon beet powder and add 1 teaspoon lavender extract (sparingly!) for a floral note.
In summer, try ½ teaspoon coconut extract and dust with toasted coconut flakes instead of powdered sugar. Each variation keeps the cookie’s tender texture while celebrating the season’s flavors.
Nutrition facts
Frequently asked questions
Can I make these without a heart-shaped cookie cutter?
Use a heart-shaped template made from cardstock and trace around it with a sharp knife. For extra precision, freeze the dough for 20 minutes before cutting to prevent smudging. A 2-inch round cutter followed by knife trimming also works well—just press firmly for clean edges.
Why did my cookies spread too much during baking?
This usually happens when the dough isn't chilled long enough or the butter was too soft. Always refrigerate the dough for at least 1 hour and use cold butter (cut into cubes). Bake at 350°F for 8-10 minutes—overbaking causes spreading too. For extra insurance, add 1 tablespoon extra cornstarch to the dry ingredients.
How do I store these cookies for gifting?
Let cookies cool completely, then place them in an airtight container with parchment paper between layers. They'll stay fresh for 5 days at room temperature or 2 weeks in the fridge. For longer storage, freeze decorated cookies (without glitter) for up to 3 months. Thaw at room temperature for 1 hour before serving.
Can I make the dough ahead of time?
Yes! The dough keeps well for 48 hours wrapped tightly in plastic in the fridge. For best results, divide and chill the disks before rolling. You can also freeze dough portions for up to 3 months—thaw in the fridge overnight before using. This makes perfect sense for holiday prep when you want to avoid last-minute baking.
What's the best way to decorate these for special occasions?
For elegant displays, pipe royal icing borders in contrasting colors (white or gold) and add edible glitter. For rustic charm, use a fork to create textured icing patterns. Try a mirror glaze** (powdered sugar + egg white) for a glossy finish. Always chill cookies 10 minutes before decorating to prevent melting.