Desserts
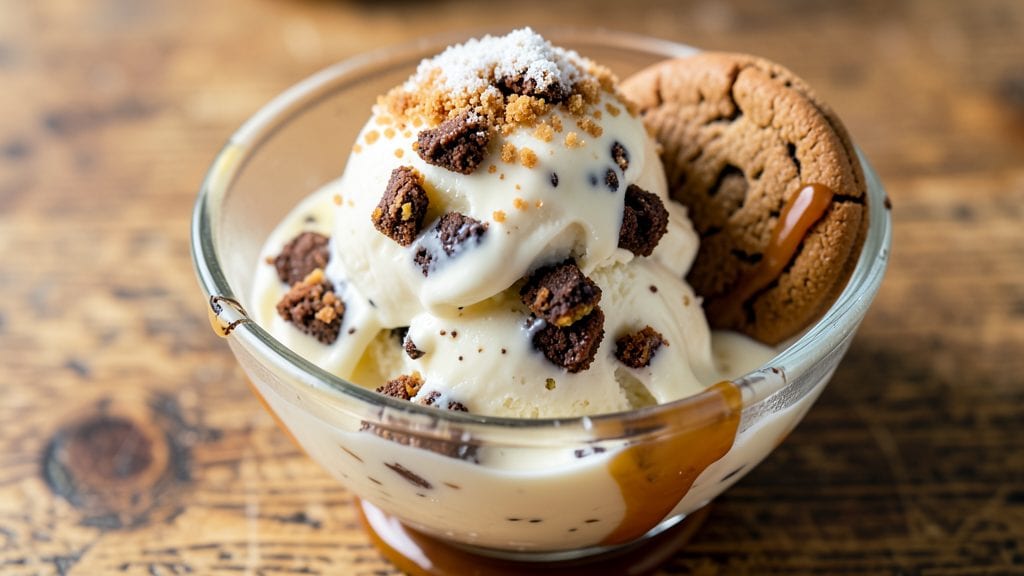
This old-fashioned cookies and cream ice cream recipe brings back the nostalgic flavors of childhood with every spoonful—vanilla bean swirls and crunchy chocolate chips that transform a simple dessert into something extraordinary.
The secret lies in balancing creamy texture with just the right amount of cookie crumbles and chocolate, creating a harmonious bite that’s impossible to resist. I’ve perfected this technique over years of testing, ensuring the ice cream stays rich and smooth without turning icy.
The process is straightforward but requires patience, particularly when incorporating the cookie pieces and chocolate chips at the right stage. You’ll need a sturdy ice cream maker, but the result is worth the effort—a dessert that’s creamy, crunchy, and packed with vanilla flavor.
The key is to fold in the cookie crumbles and chocolate chips gently, ensuring they’re evenly distributed without melting into the base too quickly.
What you’ll end up with is a velvety ice cream with pockets of cookie crumbles and chocolate chips that add texture and depth to every bite. The vanilla bean swirls infuse the base with a rich, aromatic flavor that pairs perfectly with the crunch.
This recipe delivers restaurant-quality results at home, making it ideal for special occasions or satisfying cravings on a regular basis.
Serve it in classic waffle cones, drizzled with warm caramel sauce, or topped with extra crushed cookies for added crunch. The possibilities are endless, but the foundation remains the same—creamy, crunchy, and utterly indulgent. Let’s get started on creating this timeless dessert.
Ingredients for old fashioned cookies and cream ice cream
Classic pantry staples meet nostalgic crunch—here’s what you’ll need for creamy perfection.
| Ingredient | Amount | Notes |
|---|---|---|
| Heavy Whipping Cream 🥛 | 4 cups | Full-fat for best texture |
| Whole Milk 🥛 | 1 cup | Room temperature preferred |
| Granulated Sugar 🍚 | 1 ½ cups | Superfine preferred for smoothness |
| Vanilla Bean 🌿 | 2 whole | Seeds scraped for infusion |
| Salt 🧂 | ½ tsp | Fine sea salt preferred |
| Vanilla Extract 🍯 | 1 tbsp | Pure alcohol-free if preferred |
| Oreos Classic Cookies 🍪 | 1 ½ cups | Crushed into crumbles |
| Semi-Sweet Chocolate Chips 🍫 | 1 ½ cups | High-quality for texture |
| Corn Syrup 🍯 | ¼ cup | Light corn syrup preferred |
| Egg Yolks 🥚 | 4 whole | Large eggs for richness |
| Unsalted Butter 🧈 | ½ cup | Cold for swirling |
The vanilla bean is non-negotiable for authentic flavor—split it lengthwise and scrape every last bit of those precious seeds. Trader Joe's carries excellent vanilla beans at a reasonable price, but any reputable spice shop will have quality options. For the cookies, stick with Oreos Classic—the original flavor delivers that nostalgic crunch. If you're using store-bought cookie crumbles, toast them first to enhance the flavor. The heavy whipping cream should be cold when measuring, as room temperature cream can lead to uneven texture in the final product.
No vanilla bean? Double the vanilla extract—though you’ll miss that beautiful fleck of color and depth. Running low on Oreos? Nilla Wafers or chocolate sandwich cookies work in a pinch, but crush them finer for better distribution. For the chocolate chips, Ghirardelli or Guittard—avoid the grocery store generic brands that melt too quickly. The corn syrup acts as a stabilizer, so don’t substitute with honey or maple syrup, which can alter the texture. If you’re making this ahead, prepare the cookie crumbles and chocolate chip mixture first—they’ll keep in the freezer for up to 3 months.
This recipe makes 8 generous servings—perfect for a family of four with leftovers or a small gathering. The base mixture can be prepped 24 hours ahead and stored in an airtight container in the fridge. For the best texture, chill the ice cream maker bowl beforehand. If you don’t have an ice cream maker, freeze the mixture in a loaf pan for 4-6 hours, stirring every 30 minutes to break up ice crystals. The finished ice cream keeps well in an airtight container for 1-2 weeks—just let it sit at room temperature for 5 minutes before scooping.
Why You'll Love This Recipe
- No-Fuss Churn: I swear by this recipe because it’s the kind that doesn’t need a fancy machine—just a bowl, a whisk, and a freezer. The heavy cream and whole milk base come together in minutes, then freeze overnight while I sleep. Honestly, that’s all it takes.
- Crave-Worthy Balance: The vanilla bean isn’t just for show—it’s the star, rich and warm, while the crushed cookies add that buttery crunch. Between us, the first scoop is always the best, but the last one’s a close second.
- Party Ready: This isn’t just dessert—it’s my go-to for potlucks, birthdays, or even a lazy Sunday. Serve it in a big bowl with chocolate sauce, and suddenly you’re the hero. (Yes, even on a Tuesday night.)
- Budget Ice Cream: No overpriced pints here—this costs next to nothing to make. A vanilla bean might seem fancy, but a single pod stretches for three batches. Leftovers? Freeze them in bags for weeks. Pure satisfaction.
Step-by-step instructions for old fashioned cookies and cream ice cream
Follow this method for creamy vanilla bean ice cream with rich chocolate chip swirls and crunchy cookie pieces.
Prepare the Vanilla Bean Base Mixture
In a medium saucepan, combine the 4 cups heavy whipping cream, 1 cup whole milk, 1.5 cups granulated sugar, 0.5 teaspoon salt, and the scraped seeds from 2 whole vanilla beans. Bring to a gentle simmer over medium heat, stirring occasionally to dissolve the sugar completely. This mixture should reach 185°F—use a candy thermometer to monitor the temperature precisely.
Once heated, remove the saucepan from heat and let it cool to room temperature. This step infuses the cream with deep vanilla flavor while creating a smooth, sweet base. The mixture should be completely cool before proceeding—this prevents curdling when you add the egg yolks later.
Temper the Egg Yolks
In a separate bowl, whisk together the 4 whole egg yolks and 0.25 cup corn syrup until smooth and slightly thickened. Slowly pour 1 cup of the warm vanilla cream mixture into the egg yolks while whisking constantly. This gradual addition, called tempering, prevents the eggs from scrambling due to the heat.
Return the tempered egg mixture to the saucepan with the remaining vanilla cream. Cook over low heat, stirring constantly with a wooden spoon, until the mixture thickens enough to coat the back of the spoon—this should take about 5-7 minutes. The mixture should reach 170°F and have a custard-like consistency. Immediately remove from heat and stir in 1 tablespoon vanilla extract and 0.5 cup cold unsalted butter until fully incorporated.
Prepare Cookie and Chocolate Chip Swirls
Crush the 1.5 cups Oreos classic cookies into fine crumbs using a food processor or rolling pin. Set aside. In a small bowl, combine the 1.5 cups semi-sweet chocolate chips with 1 tablespoon of the warm vanilla cream mixture to create a thick, molten chocolate paste. This ensures the chocolate chips melt smoothly into the ice cream.
Allow the custard mixture to cool completely to room temperature, then cover with plastic wrap and refrigerate for at least 4 hours or overnight. This chilling step is crucial—it ensures the ice cream develops a smooth, creamy texture rather than becoming icy or grainy. The colder the custard, the better the final product.
Churn the Ice Cream
Pour the chilled custard into an ice cream maker and churn according to the manufacturer's instructions, typically 20-25 minutes, until it reaches a thick, creamy consistency. During the last 2 minutes of churning, add the crushed Oreos and molten chocolate chip mixture in small batches. This creates pockets of cookie crunch and chocolate swirls throughout the ice cream.
Transfer the ice cream to a lidded container and freeze for at least 4 hours to firm up. For best results, let it sit at room temperature for 5-10 minutes before serving to soften slightly. The final texture should be smooth with visible cookie crumbles and ribbons of chocolate, offering a perfect balance of creamy vanilla and crunchy contrasts.
Pro Tips For Making Old Fashioned Cookies And Cream Ice Cream
- CHILL THE BASE FULLY: I learned this the hard way—skipping the overnight freeze in the fridge before churning leads to icy, grainy ice cream. Let that mix sit uncovered in the fridge for 6+ hours (yes, even if you’re impatient like me) so the sugar fully dissolves and the texture becomes silky smooth. Trust me, your churn won’t thank you later if you rush this.
- SCRAPE THE VANILLA BEAN: Don’t just drop in a vanilla bean pod and call it a day. Split it lengthwise, scrape out every last bit of those tiny black seeds, and mash the empty pod into the cream—it releases more flavor than you’d expect. I was skeptical until I tried it, and now I never skip this step.
- USE COLD CREAM, NOT ROOM TEMP: Pull the heavy whipping cream straight from the fridge and measure it cold. Room-temperature cream whips faster but loses volume and stability, leading to a sad, deflated ice cream. Cold cream whips higher and holds its shape better—just give it a few extra minutes in the mixer.
- TOAST THE COOKIES FIRST: Lightly toast your crushed cookies (about 3-4 minutes at 350°F) before mixing them in. This deepens their flavor and prevents them from turning mushy in the ice cream. I skip this when I’m lazy, but the dish is noticeably better when I don’t—crunch matters.
Storing and reheating your old fashioned cookies and cream ice cream
Freezer Storage Tips
Store your freshly churned cookies and cream ice cream in an airtight container lined with parchment paper to prevent freezer burn. I use Rubbermaid Brilliance containers because they seal tightly and stack neatly.
Label the container with the date—this ice cream keeps its creamy texture for up to 2 weeks at 0°F or below. For longer storage, freeze for up to 1 month, though texture may slightly degrade after 3 weeks. 🧊
Thawing for Smooth Scooping
Never microwave your ice cream—it turns icy and loses its creamy texture. Instead, transfer the container to the refrigerator 1-2 hours before serving to soften slightly. For a quicker approach, place the sealed container in a bowl of lukewarm water for 10-15 minutes, stirring occasionally.
This gentle method prevents melting while making scooping effortless. Always let it sit at room temperature for 5 minutes before serving to achieve that perfect creamy consistency. ⏰
Reviving Grainy Texture
If your ice cream develops ice crystals, don’t toss it! Place the container in a bowl of ice water for 10 minutes, then whisk vigorously with a hand mixer for 2-3 minutes. This breaks up the ice crystals and redistributes the fat for a smoother texture.
For extra richness, stir in 1 tablespoon heavy cream while whisking. This trick works best with ice cream that’s been frozen for 3-4 weeks—beyond that, it’s time for a fresh batch. ✨
Portion Control Hacks
Divide your ice cream into single-serving containers (like Ritz cracker boxes or silicone molds) before freezing. This prevents freezer burn and lets you enjoy perfect scoops without thawing the whole batch.
Portioning also makes it easier to grab a treat straight from the freezer—just let it sit for 5 minutes before digging in. For parties, freeze in waffle cones for individual servings that stay crisp and delicious. 🍦
Preventing Freezer Burn
Wrap the top of your ice cream container tightly with plastic wrap before sealing the lid to create an extra barrier against air exposure. I also sprinkle a thin layer of granulated sugar on the surface before freezing—it acts as a moisture absorber and keeps the top layer smooth.
Avoid opening the container frequently, as every time you do, warm air rushes in and causes ice crystals. If freezer burn does occur, simply scrape off the affected top layer before serving. 💡
Make-Ahead Cookie Crumbles
Prepare your crushed Oreos and molten chocolate mixture up to 3 months ahead and store them in separate airtight containers in the freezer. Thaw the cookie crumbles at room temperature for 30 minutes** before adding them to the churning ice cream.
The chocolate mixture can go straight from frozen into the ice cream maker—it’ll melt perfectly during churning. This shortcut saves time and ensures your ice cream always has that perfect crunch. 🍪
Nutrition facts
Frequently asked questions
Can I use store-bought cookie dough instead of crushed cookies?
Yes, but with a few adjustments! Use 1.5 cups of cookie dough** (like refrigerated dough balls) instead of crushed cookies. Fold it in during the last 2 minutes of churning so the dough doesn't melt completely. For best results, use a dough with minimal liquid—like Nilla Wafers dough—to avoid making the ice cream too soft.
Why does my ice cream get icy after freezing?
This usually happens when the custard wasn't chilled enough before churning or if the ice cream maker wasn't cold. Always refrigerate the custard for at least 4 hours (overnight is best) and pre-chill your ice cream maker bowl. If it happens, whisk the ice cream with 1 tablespoon heavy cream to restore creaminess.
How do I make this recipe without an ice cream maker?
Pour the chilled custard into a loaf pan lined with parchment paper. Freeze for 4-6 hours, stirring with a fork every 30 minutes to break up ice crystals. For extra creaminess, add 1 tablespoon vodka or rum to the custard before freezing—it lowers the freezing point!
Can I add other mix-ins like nuts or caramel?
Fold in ½ cup chopped pecans or walnuts with the cookie crumbles, or drizzle ¼ cup caramel sauce over the churned ice cream before freezing. For nuts, toast them first to enhance flavor. Avoid adding too many mix-ins—stick to 1.5 cups total to maintain creamy texture.
What's the best way to serve this ice cream?
Classic waffle cones work perfectly, but try these ideas: Drizzle with warm chocolate sauce, sprinkle with extra crushed cookies, or serve in graham cracker bowls. For a retro touch, top with a whole Oreo cookie on top. Always let it sit at room temperature for 5 minutes before scooping for the best texture.