Desserts
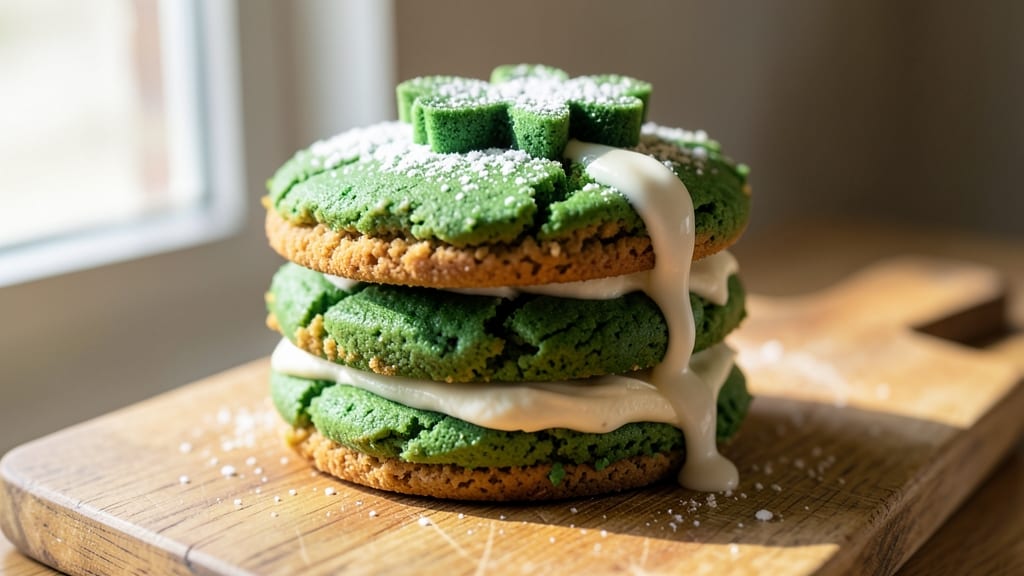
This shamrock cookie recipe transforms your kitchen into a festive St. Patrick’s Day wonderland with its vibrant green swirls and buttery cream cheese magic. 💚 The secret lies in the perfect balance of cream cheese and butter, creating a dough that’s tender yet sturdy enough to hold its shape when cut into classic shamrock forms.
I’ve baked these for years, and they’ve become a holiday staple that even the most skeptical cookie lovers can’t resist.
The beauty of these cookies is in their simplicity—just a handful of ingredients come together to create a dough that’s easy to roll, cut, and bake. The cream cheese adds a subtle tang that pairs beautifully with the sweetness, while the green food coloring gives them that perfect festive hue.
What makes them truly special is how they hold their shape while still being soft and chewy inside, with just the right amount of crispness around the edges.
By the time they emerge from the oven, your kitchen will smell like holiday magic, and your cookies will be golden with those signature shamrock patterns. The best part?
They’re perfect for decorating with sprinkles or a light dusting of powdered sugar, making them as fun to assemble as they are to eat. These cookies are the kind of treat that turns a simple dessert into a celebration.
Whether you’re baking for a St. Patrick’s Day party or just want to bring a little Irish charm to your kitchen, this recipe delivers. Let’s get started on creating cookies that’ll have everyone reaching for seconds—and maybe even thirds.
Ingredients for shamrock cookie
Buttery, creamy, and packed with festive green magic—these cookies need just 12 ingredients for pure holiday joy.
| Ingredient | Amount | Notes |
|---|---|---|
| Unsalted Butter 🧈 | 1 cup | Cold, cubed for easier mixing |
| Cream Cheese 🧀 | 8 oz | Full-fat, room temperature |
| Granulated Sugar 🍚 | 1 cup | White or light brown |
| Powdered Sugar 🍚 | ½ cup | For dusting and dough |
| Green Food Coloring 💚 | 1 tsp | Gel-based for vibrant color |
| Vanilla Extract 🍯 | 1 tsp | Pure, high-quality |
| All-Purpose Flour 🌾 | 2 ½ cups | Sifted for smooth dough |
| Baking Powder 🧂 | ½ tsp | Aluminum-free preferred |
| Salt 🧂 | ¼ tsp | Fine sea salt |
| White Chocolate Chips 🍫 | 1 cup | Optional for festive touch |
| Sprinkles 🍬 | ½ cup | Green or gold for decorating |
| Shamrock Cookie Cutter ✂️ | 1 whole | Metal or sturdy plastic |
The cream cheese is non-negotiable here. Philadelphia brand is my go-to—it’s consistently smooth and reliable. Grab the 8 oz block from the dairy section, not the tub. For the butter, Land O'Lakes or Challenge work perfectly, but avoid anything with added salt since we're controlling the flavor ourselves. The green food coloring? Wilton gel is my secret weapon—it’s vibrant and won't turn your dough into a watery mess. If you're worried about artificial colors, natural spirulina powder gives a softer green tint (but you'll need about 2 tsp). The vanilla extract should say 'pure' on the bottle—nothing with alcohol fillers here.
No cream cheese? Substitute with 4 oz softened butter plus 1/4 cup sour cream for similar texture. Running low on white chocolate chips? Use green-tinted white chocolate bars (melt and add to dough) or skip them entirely—the cookies are still delicious. The baking powder is crucial for that tender crumb, but if you're out, baking soda plus 1/4 tsp cream of tartar works in a pinch. For extra festivity, swap the sprinkles for edible gold leaf or crushed mint candies. The shamrock cutter? Amazon has great metal ones that last forever, but sturdy plastic will work too—just don't use flimsy cookie cutters that bend.
This dough keeps beautifully in the fridge for 5 days wrapped tightly in plastic. For longer storage, portion into balls, freeze on a tray, then transfer to a bag for 3 months. Bake straight from frozen, adding 1-2 minutes. The cookies stay fresh at room temperature for 3 days if you store them in an airtight container. Pro tip: Dust with powdered sugar right after baking while they're still warm—they'll look like they came from a bakery. And if you make extras? Freeze them in a single layer before stacking to prevent sticking.
Why You'll Love This Recipe
- No Mixing Madness: I swear by this—just cream butter, cream cheese, and sugar until it’s smooth. No flour, no fuss, no waiting for dough to rest. The food coloring blends right in while you mix, and suddenly you’ve got a batch of cookies that look like they came from a bakery.
- Buttery Cream Cheese Magic: That combo of butter and cream cheese? It’s like a hug in cookie form. The sugar keeps it sweet but not cloying, and the powdered sugar dusting gives it this delicate crunch. Honestly, I’ve tried other shamrock cookies, but this one stays soft for days—no dry, sad edges here.
- St. Patty’s Day Every Day: These aren’t just for March 17th. Freeze half the dough for a last-minute holiday treat, or pull them out for a green-themed party. Between us, I’ve even used them to top milkshakes (yes, really). The dough’s so forgiving that even my kid’s lopsided shamrock cuts still taste amazing.
- Pantry Staple Power: You’re probably already stocked for this. Butter, sugar, cream cheese—no weird ingredients, no last-minute grocery runs. And because they keep well in an airtight container, I’ve got backup for when I suddenly remember I forgot to buy dessert. (It happens.)
Step-by-step instructions for festive shamrock cookies
Here's how to create these magical green swirl cookies with perfect texture and vibrant color!
👨🍳 Step 1: Cream the Butter and Cream Cheese
In a large mixing bowl, combine the 1 cup unsalted butter (cold, cubed) and 8 oz cream cheese (room temperature) using a hand mixer or stand mixer fitted with the paddle attachment. Beat on medium speed for 2-3 minutes until completely smooth and fluffy. You'll see the mixture transform from lumpy to light and airy—this is your foundation for tender cookies.
Here's the thing—don't rush this step. The cream cheese needs to fully incorporate with the butter to prevent dense cookies. If you see any lumps remaining, keep mixing for another 30 seconds. The mixture should be pale and thick, almost like a light whipped cream consistency.
👨🍳 Step 2: Sweeten and Color the Dough
Add the 1 cup granulated sugar and 0.5 cup powdered sugar to the butter-cream cheese mixture. Beat on medium-high speed for 1-2 minutes until the sugars are fully dissolved and the mixture is light and fluffy. Scrape down the sides of the bowl with a spatula to ensure even mixing.
Now for the fun part! Add the 1 tsp green food coloring and 1 tsp vanilla extract. Mix on low speed for 30 seconds until the color is evenly distributed. You want a vibrant green color—if it looks too pale, add a tiny bit more coloring. The dough should now be a beautiful, consistent green throughout.
👨🍳 Step 3: Combine Dry Ingredients and Fold in Add-Ins
In a separate bowl, whisk together the 2.5 cups all-purpose flour, 0.5 tsp baking powder, and 0.25 tsp salt. Gradually add this dry mixture to your wet ingredients, mixing on low speed just until combined. You'll see flour streaks disappear, but don't overmix—stop as soon as everything comes together.
Remove the bowl from the mixer and gently fold in the 1 cup white chocolate chips and 0.5 cup sprinkles using a silicone spatula. Be careful not to overmix—just distribute the chocolate chips and sprinkles evenly throughout the dough. The dough will be soft and slightly sticky, which is perfect for shaping!
🥘 Step 4: Chill and Shape the Cookies
Divide the dough into 4 equal portions (about 1 cup each) and flatten each portion into a ½-inch thick disk. Wrap each disk tightly in plastic wrap and refrigerate for at least 1 hour (or up to 24 hours). Chilling is crucial—it firms up the dough so it holds its shape when you cut the shamrocks.
Here's where the magic happens: After chilling, preheat your oven to 350°F. Roll out each dough disk on a lightly floured surface to about ¼-inch thickness. Use the shamrock cookie cutter to cut out shapes, gently re-rolling the scraps to make more cookies. Place cookies 2 inches apart on ungreased baking sheets.
🔥 Step 5: Bake to Golden Perfection
Bake the cookies for 9-11 minutes until the edges are just beginning to turn golden but the centers still look slightly underdone. They'll continue cooking on the hot baking sheet after you remove them from the oven. Don't overbake—they should be soft and tender with just a hint of crispness at the edges.
Let the cookies cool on the baking sheet for 5 minutes before transferring to a wire rack to cool completely. The centers should be soft and slightly chewy, while the edges have that perfect golden-brown color. For extra festive flair, sprinkle additional green or gold sprinkles on top while they're still warm!
Pro Tips For Making Shamrock Cookie
- Cream Cheese First: DESCRIPTION: Beat the cream cheese until it’s completely smooth and pale before adding anything else—no streaks, no lumps. I learned this the hard way after ending up with grainy cookies that tasted like they’d been made with cottage cheese instead. Five minutes of extra mixing at medium speed makes all the difference.
- Room-Temp Butter: DESCRIPTION: Take the butter out of the fridge 30 minutes before you start. Cold butter means your dough will fight you—it won’t cream properly, and your cookies will spread into sad, flat pancakes. Soft but not melted is the goal (press a finger in; if it leaves a dent, you’re good).
- Skip the Overmixing: DESCRIPTION: Once you fold in the green coloring, stop mixing the second it’s evenly distributed. Overworking the dough adds gluten, and those cookies turn out tough instead of tender. Two turns of a spatula is all you need—yes, even if it looks uneven.
- Chill the Dough: DESCRIPTION: Let the dough rest in the fridge for at least an hour—overnight is better. This isn’t just about convenience; it lets the flour absorb moisture and prevents the cookies from spreading into greasy puddles in the oven. Trust me, your future self will thank you.
Essential equipment for this dish
Mixing Essentials
Start with a stand mixer or hand mixer—I swear by my KitchenAid Artisan Series for this recipe. The paddle attachment ensures smooth, lump-free mixing of the butter and cream cheese. If you don’t have a mixer, a sturdy wooden spoon and strong arm work, but expect more elbow grease.
For measuring, invest in a scale for precision—especially with the cream cheese and butter. I use my OXO Good Grips scale for accuracy down to the gram.
Cutting Tools
A shamrock-shaped cookie cutter is non-negotiable for that festive look. I recommend metal cutters from Wilton or Amazon Basics—they hold their shape and last for years.
For rolling out the dough, use a chilled rolling pin (place it in the freezer for 10 minutes before use) to prevent the dough from sticking. A lightly floured surface works best, but I keep cornstarch nearby for extra prevention.
Baking Gear
Your oven needs to be preheated to 350°F for perfect results, so a reliable oven thermometer (like Thermoworks Oven Thermometer) ensures accuracy. Bake on ungreased baking sheets—I use half-sheet pans for even heat distribution.
Line them with parchment paper if you’re worried about sticking, but the dough releases easily with proper chilling. A wire cooling rack keeps cookies from getting soggy while they cool.
Decorating Supplies
For that extra festive touch, grab green or gold sprinkles (I love Sprinkles Galore brand) and a fine-mesh sieve for even distribution. A pastry brush helps apply melted white chocolate drizzle if you want to get fancy.
If you’re using edible gold leaf, a soft paintbrush works best—just handle it gently to avoid tearing. Store extra sprinkles in an airtight container to keep them fresh for your next baking project.
Storage Solutions
After baking, let cookies cool completely before storing in airtight containers (I use Rubbermaid Brilliance containers). For long-term storage, freeze dough balls on a tray before transferring to a ziplock bag—they’ll keep for 3 months.
When reheating, I pop them in the oven at 300°F for 3-5 minutes to restore that fresh-baked texture. A damp paper towel over the oven rack prevents condensation from making cookies soggy.
Nutrition facts
Frequently asked questions
Can I make these cookies without a mixer?
While a mixer makes it easier, you can achieve great results with a sturdy wooden spoon or even your hands. The key is to work the butter and cream cheese together until completely smooth—it just takes more elbow grease. Mix the dry ingredients by hand, then fold in the chocolate chips and sprinkles gently with a spatula.
Why did my cookies spread too much?
Overmixing the dough or skipping the 1-hour chill time are the most common causes. The dough needs to firm up to hold its shape. Also, ensure your oven is properly preheated to 350°F—a cooler oven causes cookies to spread. For extra insurance, chill the shaped cookies on the baking sheet for 15 minutes before baking.
How can I make the green color more vibrant?
Use gel-based food coloring instead of liquid—it won't dilute your dough. For an even deeper green, add 1/4 tsp yellow gel coloring to the mix (just a tiny bit makes a big difference). If you prefer natural coloring, try 2 tsp spirulina powder for a softer green tint. Always start with less and adjust gradually.
Can I substitute the white chocolate chips?
Yes! Swap them for green-tinted white chocolate bars (melt and mix into dough) or skip them entirely—the cookies will still be delicious. For a festive twist, try mini marshmallows (they'll puff up slightly when baked) or crushed mint candies for a holiday flavor. Just reduce the total volume by 1/4 cup if using larger add-ins.
How do I store these cookies for St. Patrick's Day parties?
Keep them fresh for 3 days at room temperature in an airtight container with parchment paper between layers. For longer storage, freeze dough balls on a tray, then transfer to a bag for 3 months. To serve, bake straight from frozen (add 1-2 minutes to baking time). For a restaurant-style presentation, dust with powdered sugar right after baking.