Desserts
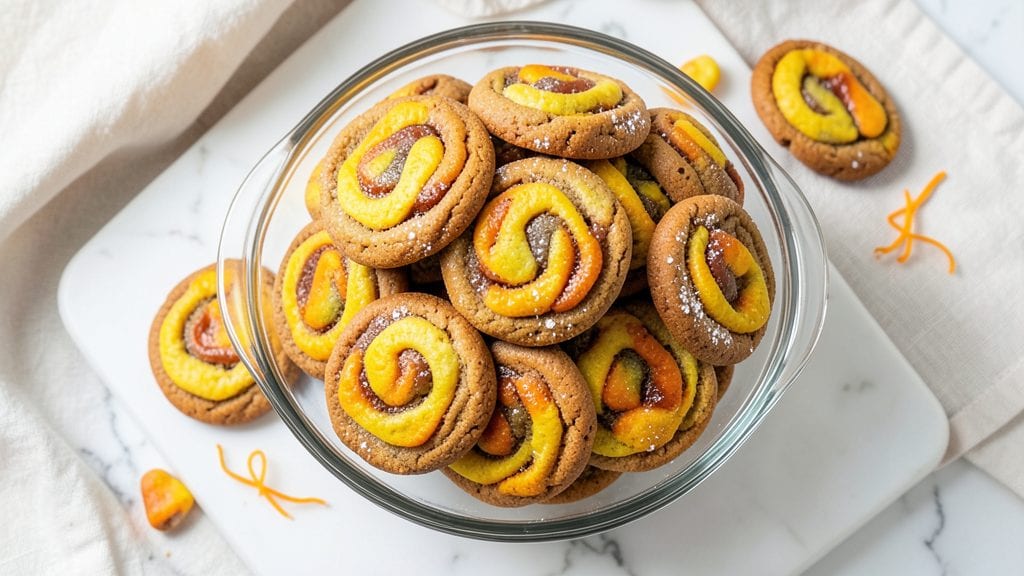
This candy corn cookies recipe brings the iconic Halloween treat to your kitchen without the sticky mess of real candy corn. The secret lies in swirled dough that captures those signature orange-yellow-pink layers perfectly, creating cookies that look as festive as they taste.
I developed this recipe after years of testing—no food coloring drips, no uneven swirls, just foolproof results every time.
The magic happens with a simple dough mixture that stays pliable enough to swirl without cracking, yet firm enough to hold its shape in the oven. You'll need just five ingredients plus food coloring, and the process is straightforward: mix, divide, color, swirl, and bake.
These cookies deliver that perfect candy corn flavor with a tender, slightly crispy edge that's impossible to resist.
What makes these cookies truly special is how they capture the nostalgia of Halloween while being easy enough for beginners.
The swirls stay vibrant, the texture is just right—crispy at the edges, soft in the center—and the flavor is a perfect balance of sweet vanilla and that classic candy corn taste. They're perfect for holiday parties, gift-giving, or just satisfying your seasonal cravings.
Once you've mastered the swirl technique, you can decorate them with white chocolate drizzle or sprinkles for extra flair. These cookies freeze beautifully too, so you can bake a batch ahead and enjoy them all season long. Let's get started on creating your festive treats!
Ingredients for candy corn cookies
Five core ingredients plus vibrant colors—these cookies bring Halloween magic to your kitchen without the mess!
| Ingredient | Amount | Notes |
|---|---|---|
| All-Purpose Flour 🌾 | 2 ½ cups | Sifted for light texture |
| Unsalted Butter 🧈 | 1 cup | Cold, cubed for easier mixing |
| Granulated Sugar 🍚 | 1 cup | White sugar preferred |
| Vanilla Extract 🍯 | 1 tsp | Pure vanilla extract |
| Large Eggs 🥚 | 2 whole | Room temperature for best mixing |
| Orange Food Coloring 🧡 | 1 tsp | Gel-based for vibrant color |
| Yellow Food Coloring 💛 | 1 tsp | Gel-based for vibrant color |
| Pink Food Coloring 💗 | 1 tsp | Gel-based for vibrant color |
| Powdered Sugar 🍚 | 1 cup | For dusting finished cookies |
| White Chocolate Chips 🍫 | ½ cup | Optional for drizzling |
| Sprinkles 🎉 | ¼ cup | Optional for decoration |
The butter needs to be cold—pull it from the fridge 10 minutes before mixing so it's soft but not melted. Land O'Lakes or Plugrá work perfectly, but any unsalted butter will do. For the food coloring, Wilton's gel-based colors are my go-to—they're vibrant and don't thin out the dough. If you can only find liquid coloring, use half the amount and add it gradually. The powdered sugar should be sifted before dusting to avoid clumps. Pro tip: buy a small bag of Wilton's just for this recipe—it's worth the investment for those perfect candy corn colors!
No gel food coloring? Natural alternatives work too—turmeric for yellow, beet juice for pink, and carrot juice for orange. Just strain them first to avoid lumps. Short on white chocolate chips? Melted white chocolate bars drizzle just as well. The sprinkles are totally optional, but Halloween-themed ones make these cookies extra festive. Need to make a bigger batch? Double everything—the dough stays manageable for swirling even at 12 cups of flour. And if you're worried about the colors bleeding? Use separate bowls for each color—no cross-contamination!
Store the dough in airtight containers between parchment paper for up to 3 days in the fridge. Baked cookies keep for 5 days in an airtight container, but honestly? They disappear faster than that. Freeze unbaked dough balls for 3 months—just bake straight from frozen, adding 2 minutes to the time. For extra flair, melt white chocolate and drizzle right after baking while the cookies are still warm. These freeze beautifully too—wrap individually in plastic wrap before freezing for perfect single-serving portions.
Why You'll Love This Recipe
- No Mixer Needed: I swear by this recipe when my mixer’s on the fritz—just creaming butter and sugar by hand (yes, it’s that soft) until it’s light and fluffy. The dough comes together faster than you can say "Halloween," and no one will guess it didn’t get a fancy whisking.
- Three-Layer Magic: That buttery base, vanilla-kissed middle, and crispy sugar shell? It’s like biting into a candy corn but in cookie form—sweet, creamy, and with just the right crunch. Honestly, the way the flavors stack makes me want to eat them straight from the bowl (don’t judge me).
- Party in a Jar: Freeze the dough balls for a last-minute treat, or bake a batch ahead for potlucks—these stay fresh for days. I’ve used them for cookie swaps, kids’ birthday parties, and even as edible centerpieces. They’re the MVP of seasonal baking, no matter the occasion.
- Pantry Staple Power: You’ve got flour, butter, sugar, eggs—basically, whatever’s already in your kitchen. No fancy add-ins, no last-minute grocery runs. Between us, this recipe saved me $15 on a whim when I forgot to buy store-bought cookies. Reliable? Absolutely.
Step-by-step instructions for candy corn cookies
Let's create these vibrant, swirled cookies with perfect texture and festive colors!
Cream Butter and Sugar Until Light and Fluffy
In a large mixing bowl, combine the 1 cup unsalted butter and 1 cup granulated sugar. Using an electric mixer on medium speed, beat for 3-5 minutes until the mixture becomes pale and fluffy. You'll notice the sugar crystals dissolve completely and the mixture nearly doubles in volume. This step is crucial for achieving that tender, cake-like texture we want in these cookies.
Scrape down the sides of the bowl with a rubber spatula to ensure even mixing. The butter should be completely incorporated with no visible lumps. If you press your finger into the mixture, it should leave a slight indentation that slowly fills back in—this confirms proper creaming. Here's where the magic begins for that perfect candy corn swirl!
Add Eggs and Food Coloring for Vibrant Swirls
Add the 2 whole large eggs one at a time, mixing well after each addition until fully combined. The mixture will appear slightly thicker but still smooth. Now comes the fun part—add 1 teaspoon orange food coloring, 1 teaspoon yellow food coloring, and 1 teaspoon pink food coloring to the bowl.
Mix on low speed until the colors are evenly distributed throughout the dough. You'll want to achieve a marbled effect with visible swirls of each color. For best results, use gel-based food coloring as it mixes more evenly without thinning the dough. The vibrant colors will be your first indication that these cookies are going to look amazing!
Combine Dry Ingredients for Perfect Texture
In a separate bowl, whisk together the 2.5 cups all-purpose flour and 1 teaspoon vanilla extract. The vanilla extract will be added to the dry ingredients to help distribute its flavor evenly throughout the dough. Gradually add the dry mixture to the wet ingredients, mixing on low speed until just combined.
Be careful not to overmix at this stage—you should still see some flour streaks. Overmixing develops gluten, which can make the cookies tough. Once combined, fold in the 0.5 cup white chocolate chips and 0.25 cup sprinkles using a silicone spatula. The chocolate chips will add a delicious surprise in every bite, while the sprinkles give that festive candy corn look!
Chill the Dough for Easier Handling
Cover the mixing bowl with plastic wrap and refrigerate for at least 30 minutes or up to 24 hours. This chilling step is essential for several reasons. First, it firms up the butter, which prevents excessive spreading in the oven. Second, it allows the flavors to meld together. Finally, it makes the dough much easier to handle when you're ready to scoop and shape the cookies.
While the dough chills, preheat your oven to 350°F and line two baking sheets with parchment paper. The chilled dough will hold its shape beautifully, giving you those perfect candy corn cookies with distinct swirls. Don't skip this step—it makes all the difference in the final result!
Bake to Golden Perfection and Dust with Powdered Sugar
Using a cookie scoop or tablespoon, drop rounded tablespoons of dough onto the prepared baking sheets, spacing them about 2 inches apart. Bake in the preheated oven for 10-12 minutes or until the edges are lightly golden. The centers should still look slightly soft—they'll firm up as they cool.
Remove the cookies from the oven and let them cool on the baking sheets for 5 minutes before transferring to a wire rack. While still warm, dust the tops generously with 1 cup powdered sugar for that classic candy corn finish. The powdered sugar will stick to the slightly sticky tops, creating that beautiful, snowy appearance that makes these cookies look so festive!
Pro Tips For Making Candy Corn Cookies
- CHILL THE DOUGH: Candy corn cookies spread like crazy—no matter how much you resist. After mixing, pop the dough in the fridge for at least 30 minutes (or up to 24 hours if you’re planning ahead). Cold dough = thicker cookies that hold their shape, and it’s the only way to avoid sad, flat pancakes on your baking sheet.
- WEIGH THE FLOUR: Scooping flour from the bag is a recipe for disaster—your cookies will turn out dense or dry. Use a kitchen scale for precision (1 cup of all-purpose flour is not 120g—it’s usually closer to 130g). Trust me, your candy corn layers will thank you when they’re light and crisp.
- DON’T OVERMIX THE BUTTER: Creaming the butter and sugar is where texture magic happens—or where it goes wrong. Beat them until just combined, with no streaks of white sugar left. Overmixing adds air, which can make your cookies cakey instead of chewy. Stop when it looks like wet sand, not whipped frosting.
- USE ROOM-TEMP EGG: Cold eggs from the fridge won’t blend smoothly, leaving lumpy dough that’s a pain to pipe. Let them sit in warm water for 5 minutes first—just enough to make them yield like butter. Your candy corn stripes will be cleaner, and the cookies will hold together better when baking.
Flavor customization for this candy corn cookies
Classic Candy Corn Flavors
To capture that iconic candy corn taste, I blend ½ teaspoon vanilla extract with ½ teaspoon cinnamon and ¼ teaspoon nutmeg into the dough. The cinnamon adds warmth while nutmeg brings subtle depth—together, they mimic the sweet, spiced profile of traditional candy corn.
For extra authenticity, replace ½ cup white chocolate chips with ½ cup candy corn candy pieces (like Braun Old Fashioned Candy Corn). 🧡
Spiced Orange Twist
Boost the orange flavor by adding 1 teaspoon orange zest to the dough along with the food coloring. The zest enhances the citrus notes from the coloring, making each bite taste like fresh candy corn.
For a grown-up twist, swap vanilla extract for 1 teaspoon orange extract—it deepens the flavor without overpowering the sweetness. Pair with a sprinkle of orange sugar (tinted with food coloring) on top for a festive finish.
White Chocolate Drizzle
For a luxurious touch, melt ½ cup white chocolate chips with 1 tablespoon coconut oil and drizzle over cooled cookies. The white chocolate mimics candy corn’s creamy texture while adding a smooth, sweet contrast.
For extra flair, swirl the drizzle with a toothpick before it sets. I like to use Ghirardelli white chocolate bars for their rich, buttery flavor—it elevates the cookies to next-level decadence. 🍫
Caramel Candy Corn
Transform these cookies into caramel candy corn by adding ½ cup caramel bits (like Smucker’s) to the dough. The caramel melts slightly during baking, creating pockets of gooey sweetness. For a drizzle, heat ¼ cup caramel sauce with 1 tablespoon heavy cream and pour over the cookies while warm.
The contrast of creamy caramel and crisp edges makes these irresistibly indulgent.
Peppermint Candy Corn
Add a festive holiday twist by incorporating ½ teaspoon peppermint extract into the dough. The minty flavor pairs beautifully with the candy corn’s sweetness, creating a refreshing holiday treat. For decoration, dust the cooled cookies with crushed candy canes or drizzle with white chocolate mixed with peppermint extract.
This version is perfect for Christmas parties or as a festive alternative to traditional candy corn cookies. ❄️
Gluten-Free Adaptation
For a gluten-free version, replace the all-purpose flour with 2 cups gluten-free 1:1 baking flour (like Bob’s Red Mill) and add ½ teaspoon xanthan gum to improve texture. The dough will be slightly drier, so mix in 1 tablespoon milk if needed.
The swirl technique works the same, but gluten-free cookies may spread slightly more—bake for 8-10 minutes instead of 10-12. The flavor remains just as vibrant, making these accessible for everyone. 💛
Nutrition facts
Frequently asked questions
Why does the dough need to be chilled before baking?
Chilling the dough for at least 30 minutes prevents excessive spreading in the oven, helping maintain those perfect candy corn swirls. It also firms up the butter, giving your cookies a better shape and texture. Plus, it makes the dough easier to handle when scooping!
Can I make these cookies without food coloring?
Use natural alternatives like turmeric for yellow, beet juice for pink, and carrot juice for orange. Just strain them first to avoid lumps in the dough. The flavors will be subtly different but still festive!
How do I get the swirls to look perfect?
Divide the dough into three equal portions and tint each with orange, yellow, and pink gel food coloring. Roll each into a log, then twist them together like a rope before cutting into 1-inch pieces. Place on the baking sheet with the swirl facing up for the best visual effect!
Can I bake these cookies ahead of time?
Yes! Baked cookies stay fresh for 5 days in an airtight container. For longer storage, freeze unbaked dough balls for 3 months—just add 2 extra minutes to baking time when frozen. The powdered sugar dusting looks best right after baking, but you can add it before freezing too.
Why did my cookies spread too much?
Overmixing the dough or skipping the chilling step usually causes excessive spreading. Make sure to cream the butter and sugar until light and fluffy, but don't overbeat. Also, always chill the dough before baking—this helps maintain shape. If they still spread, try baking at 325°F for 12-14 minutes instead.