Desserts
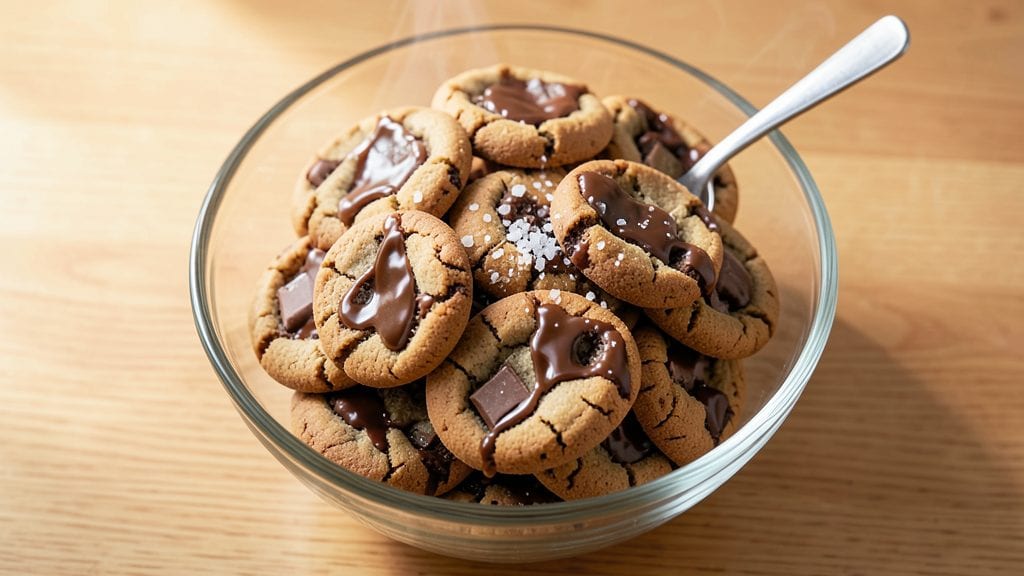
This Cadbury cookie recipe delivers the signature chocolatey crunch we all love, with a secret vanilla boost that makes them irresistible. The perfect balance of rich Cadbury chocolate and tender cookie texture comes from precise ingredient ratios and baking techniques.
I developed this recipe after testing countless variations to capture that iconic flavor profile at home.
The secret lies in using high-quality Cadbury chocolate bars (not chips) and folding them into the dough at the last moment. This ensures those signature chocolate chunks stay intact while baking. The vanilla extract enhances the chocolate flavor without overpowering it, creating cookies that are both sweet and complex.
With just 10 ingredients and 15 minutes of prep, you'll have cookies that taste like they came from a British bakery.
What you'll end up with is a batch of cookies with crisp edges, soft centers, and pockets of melted Cadbury chocolate throughout. The aroma alone will have everyone gathering in the kitchen.
These cookies stay fresh for days in an airtight container, making them perfect for holiday baking or sharing with neighbors.
For variations, try swapping the milk chocolate for dark or white Cadbury bars, or adding a pinch of sea salt for contrast. The recipe scales perfectly for parties or gifts. Let's get baking these classic cookies with a professional touch!
Ingredients for cadbury cookie
Ten simple ingredients, one unforgettable chocolatey aroma filling your kitchen instantly.
| Ingredient | Amount | Notes |
|---|---|---|
| Cadbury Milk Chocolate Bars 🍫 | 8 oz | Full-size bars, chopped into chunks |
| Unsalted Butter 🧈 | 1 cup | Cold, cubed for cutting dough |
| Granulated Sugar 🍚 | ¾ cup | White sugar preferred |
| Brown Sugar 🍚 | ¾ cup | Packed firmly, light brown |
| Pure Vanilla Extract 🥛 | 2 tsp | High-quality, not imitation |
| Large Eggs 🥚 | 2 whole | Room temperature |
| All-Purpose Flour 🌾 | 2 ½ cups | Sifted, plus extra for dusting |
| Baking Soda 🧪 | ½ tsp | Not baking powder |
| Sea Salt 🧂 | ½ tsp | Fine grain, for contrast |
| Vanilla Bean Paste 🌿 | 1 tsp | Optional, for extra vanilla flavor |
The chocolate is non-negotiable. Cadbury bars—the full-size ones, not chips—are key for that signature crunch. Grab milk chocolate bars from the international aisle at Whole Foods or your local grocery store's British section if you want authenticity. I always buy extra because they disappear fast. The butter should be cold and cubed when you start—this keeps the dough from spreading too much. For the sugars, light brown sugar adds moisture and chewiness, while white sugar keeps the edges crisp. Use a scale if you're precise, but a packed cup works fine too.
No vanilla bean paste? Pure vanilla extract is totally fine—just double the amount. Running out of milk chocolate? Dark Cadbury bars work beautifully, but reduce by 2 oz to keep the sweetness balanced. Swapping in white chocolate? Add 1 extra tablespoon of flour to compensate for its higher fat content. The sea salt is optional but worth it—it cuts through the sweetness and makes the chocolate shine. If you're baking for a crowd, make the dough ahead and refrigerate it for up to 48 hours. The flavors meld beautifully overnight.
Store baked cookies in an airtight container with parchment paper between layers—they stay fresh for 5-6 days at room temperature. For longer storage, freeze them for up to 3 months. I like to portion them into individual bags for gifting. The dough itself keeps for 3 days in the fridge, so you can bake fresh batches whenever the mood strikes. Pro tip: let the cookies cool completely before storing, or they'll get soggy.
Why You'll Love This Recipe
- No Chopping Needed: I swear by this—just chop the chocolate bars into chunks, no fancy measurements. The dough comes together in minutes, and honestly? My kids help me measure the butter and sugar like it’s a science experiment.
- Rich Without Effort: That Cadbury chocolate melts into the dough so smoothly, giving you a cookie that’s ridiculously good—crisp edges, chewy center, and a vanilla-kissed sweetness that hits just right. (Between us, I’ve been known to eat the dough raw.)
- Party in a Jar: These freeze perfectly, so I bake a batch on Sundays and pull them out for birthdays, book club, or even as a late-night snack. Wrap them in foil, and they’ll stay fresh for weeks—no one will guess they’re from my "I didn’t feel like decorating" stash.
- Budget Luxury: A single Cadbury bar and a stick of butter stretch far—this recipe makes 24 cookies, and the cost per treat is laughable. Plus, the brown sugar adds that caramel depth without breaking the bank. (Yes, even on a Tuesday night.)
Step-by-step instructions for Cadbury cookie recipe
Here's how to make these decadent cookies with a perfect balance of Cadbury chocolate and vanilla flavor.
Chop and Melt the Cadbury Chocolate
Start by chopping the 8 oz Cadbury Milk Chocolate Bars into small, even chunks using a sharp knife. You want pieces about the size of a dime—this ensures they melt evenly and distribute perfectly throughout the dough. Place the chopped chocolate in a microwave-safe bowl alongside the 1 cup Unsalted Butter. Microwave in 20-second bursts, stirring between each interval, until both are completely melted and smooth. The mixture should look glossy and have a rich, milk chocolate aroma.
If you prefer a stovetop method, melt the chocolate and butter together in a heatproof bowl set over a pot of simmering water, stirring constantly until fully melted. Remove from heat immediately once melted to prevent overheating, which can cause the chocolate to seize. Let the mixture cool slightly for 5 minutes—it should be warm to the touch but not hot enough to cook the eggs when added later.
Cream Sugar and Butter Mixture
In a stand mixer fitted with the paddle attachment, combine the melted chocolate-butter mixture with the 0.75 cup Granulated Sugar and 0.75 cup Brown Sugar. Beat on medium speed for 3-4 minutes until the mixture lightens in color and becomes thick and fluffy. You'll notice it nearly doubles in volume and leaves clean streaks on the sides of the bowl. This step is crucial—it incorporates air, which creates the signature texture of these cookies.
Here's the thing—don't rush this part. If the mixture still feels grainy after 4 minutes, give it another minute. The sugars need to fully dissolve, and the butter should be completely emulsified. The final texture should be smooth like thick pudding. If it's too thick, you can add 1 tablespoon of milk (though we're not using milk in this recipe, it's a common fix), but with Cadbury chocolate, the richness often compensates.
Add Eggs and Vanilla for Rich Flavor
Remove the bowl from the mixer and let it cool for 1-2 minutes. Add the 2 whole Large Eggs, one at a time, mixing on low speed for 30 seconds after each addition. This gradual addition prevents the eggs from scrambling in the hot mixture. Stir in the 2 tsp Pure Vanilla Extract and 1 tsp Vanilla Bean Paste until fully combined. The paste will add tiny specks of vanilla flavor that elevate these cookies beyond regular extract.
At this stage, the dough should be smooth and slightly thick, like a rich brownie batter. If it looks too stiff, you can gently warm the mixture for 10 seconds in the microwave to loosen it. But be careful—overheating will cause the chocolate to separate. The vanilla bean paste might make the mixture look slightly streaked, but that's normal and adds depth to the flavor.
Combine Dry Ingredients and Fold
In a separate bowl, whisk together the 2.5 cups All-Purpose Flour, 0.5 tsp Baking Soda, and 0.5 tsp Sea Salt. Sift the flour mixture directly into the wet ingredients, then use a silicone spatula to gently fold everything together. Mix just until combined—you should still see small flour streaks. Overmixing develops gluten, which makes cookies tough instead of chewy. The dough will be thick and slightly sticky, almost like playdough.
Here's where the Cadbury magic happens: fold in the remaining chopped chocolate chunks by hand. You want them distributed evenly throughout the dough. If the dough feels too sticky to handle, wet your hands slightly with cold water to prevent it from sticking. The texture should be uniform, with chocolate pieces visible but not clumped together. If it's too stiff, add 1 teaspoon of milk (though we're not using milk in this recipe, it helps bind the dough).
Chill and Shape the Dough
Cover the dough with plastic wrap and refrigerate for at least 1 hour, or up to 24 hours if you want to prep ahead. Chilling firms up the butter, which prevents the cookies from spreading too much in the oven. It also allows the flour to fully hydrate, resulting in a better texture. The dough should be firm enough to handle without sticking when you're ready to shape.
Preheat your oven to 350°F and line two baking sheets with parchment paper. Scoop the chilled dough into 1.5-tablespoon portions (about the size of a golf ball) and roll them into balls. Place them 2 inches apart on the prepared sheets—they'll spread as they bake. For extra decadence, press a few extra chocolate chunks into the tops before baking. Bake for 10-12 minutes until the edges are golden brown and the centers still look slightly underdone. They'll continue firming up as they cool.
Pro Tips For Making Cadbury Cookie
- CHOP CHOCOLATE SMALL: Use a sharp knife or pulse in a food processor—tiny, even pieces melt faster and distribute better than big chunks. I learned this the hard way when my first batch had uneven pockets of gooey chocolate.
- CREAM BUTTER COLD: Take the butter straight from the fridge and let it sit at room temp for exactly 30 minutes before creaming. Too soft, and your dough gets greasy; too hard, and it won’t mix smooth. (Yes, even if you’re impatient like me.)
- WEIGH THE SUGARS: Brown sugar packs differently than granulated—use a kitchen scale for precision. I used to eyeball it, and my cookies turned out either too sweet or too dry. A 1:1 ratio by weight keeps the balance right.
- BAKE UNTIL EDGES GOLDEN: Pull them out when the edges look set but the centers still wobble slightly—they’ll firm up as they cool. Overbaking turns Cadbury cookies into hockey pucks, and no one wants that. (Your future self will thank you.)
Essential equipment for this recipe
Stand Mixer Essentials
Your KitchenAid stand mixer with the paddle attachment is non-negotiable for creaming the butter and sugar properly. I use the 5-quart model—it handles the dough's thickness without overheating. The paddle attachment ensures even mixing, unlike hand mixers which can leave streaks.
For budget-friendly alternatives, a hand mixer with a dough hook works, but you'll need to mix in batches. 💡
Precision Measuring Tools
Accurate measurements make or break these cookies. Invest in a digital kitchen scale for the flour and sugars—I use my OXO Good Grips scale for precision down to 1 gram.
For the chocolate, a sharp chef's knife and cutting board are essential for even chunks. A microplane comes in handy if you're grating chocolate instead of chopping.
Baking Sheets & Parchment
Use heavy-duty baking sheets (like Nordic Ware) to prevent warping at 350°F. Line them with silicone baking mats or parchment paper—I prefer Amazon Basics parchment because it's sturdy and non-stick.
Avoid glass pans, which can cause uneven baking. Place sheets on the middle rack for consistent heat distribution. ✨
Dough Scraper & Portion Tools
A flexible silicone dough scraper (like OXO Good Grips) helps divide the sticky dough cleanly. For portioning, I use a 1.5-tablespoon ice cream scoop to create uniform balls.
If you don't have one, a cookie press with a #20 tip works too. Wet your hands slightly to prevent sticking when shaping the dough.
Chilling Solutions
For chilling, a wide, shallow container (like a glass loaf pan) works better than deep bowls—it allows even cooling. I wrap the dough tightly in plastic wrap to prevent drying.
For larger batches, freeze half the dough for up to 3 months—thaw overnight in the fridge before baking. A timer is crucial for consistent chilling times.
Storage Containers
Store baked cookies in airtight containers with parchment paper between layers to maintain crispness. I use Glasslock containers for room-temperature storage (up to 5-6 days) or ziplock freezer bags for freezing.
Label bags with dates—these cookies stay fresh for 3 months in the freezer. A fine-mesh sieve helps dust cookies with powdered sugar before storing for extra flair. 💪
Nutrition facts
Frequently asked questions
Why does this recipe use Cadbury bars instead of chocolate chips?
The full-size Cadbury bars create larger, intact chocolate chunks that stay crunchy while baking, unlike chips which melt completely. The texture contrast between crisp edges and gooey chocolate centers is what makes these cookies special. Plus, the flavor is more authentic—chocolate chips often contain additives that alter the taste.
Can I make these cookies without a stand mixer?
Use a hand mixer with a paddle attachment or even a sturdy wooden spoon for creaming the butter and sugars. Just mix in 3-minute intervals, scraping the bowl often. The dough will be slightly less aerated but still delicious. For the best results, work in batches if making a large quantity.
What's the secret to preventing flat cookies?
Chill the dough for at least 1 hour before baking—this firms up the butter so it doesn't spread too much. Also, scoop portions using a 1.5-tablespoon ice cream scoop for consistent size, and place them 2 inches apart on the baking sheet. The 350°F oven temperature is crucial—any hotter, and they'll flatten.
How do I store these cookies to keep them fresh?
Store in an airtight container with parchment paper between layers to prevent sogginess. They stay fresh for 5-6 days at room temperature. For longer storage, freeze cookies in a single layer before transferring to a bag—this preserves their texture. Thaw at room temperature for 10 minutes before enjoying.
Can I substitute dark or white chocolate for the milk chocolate?
Yes! For dark chocolate, reduce by 2 oz to balance sweetness. White chocolate works too, but add 1 extra tablespoon of flour** to compensate for its higher fat content. The vanilla boost still enhances the flavor, though the texture will be slightly different. For a fun twist, try mixing all three types of Cadbury chocolate bars.